> ## Documentation Index
> Fetch the complete documentation index at: https://docs.preview.io/llms.txt
> Use this file to discover all available pages before exploring further.
# Get started in Preview
> A quick tour of how a project comes together in Preview, from your first canvas to a fully organized shoot.
Preview is a collaborative canvas for making and organizing AI video and image projects, start to finish. Here's the shape of a project, step by step.
Select **New Project**. Your project is the top-level container for canvases, shot lists, collaborators, and saved files; it starts as "Untitled Project", renameable anytime from the project menu.
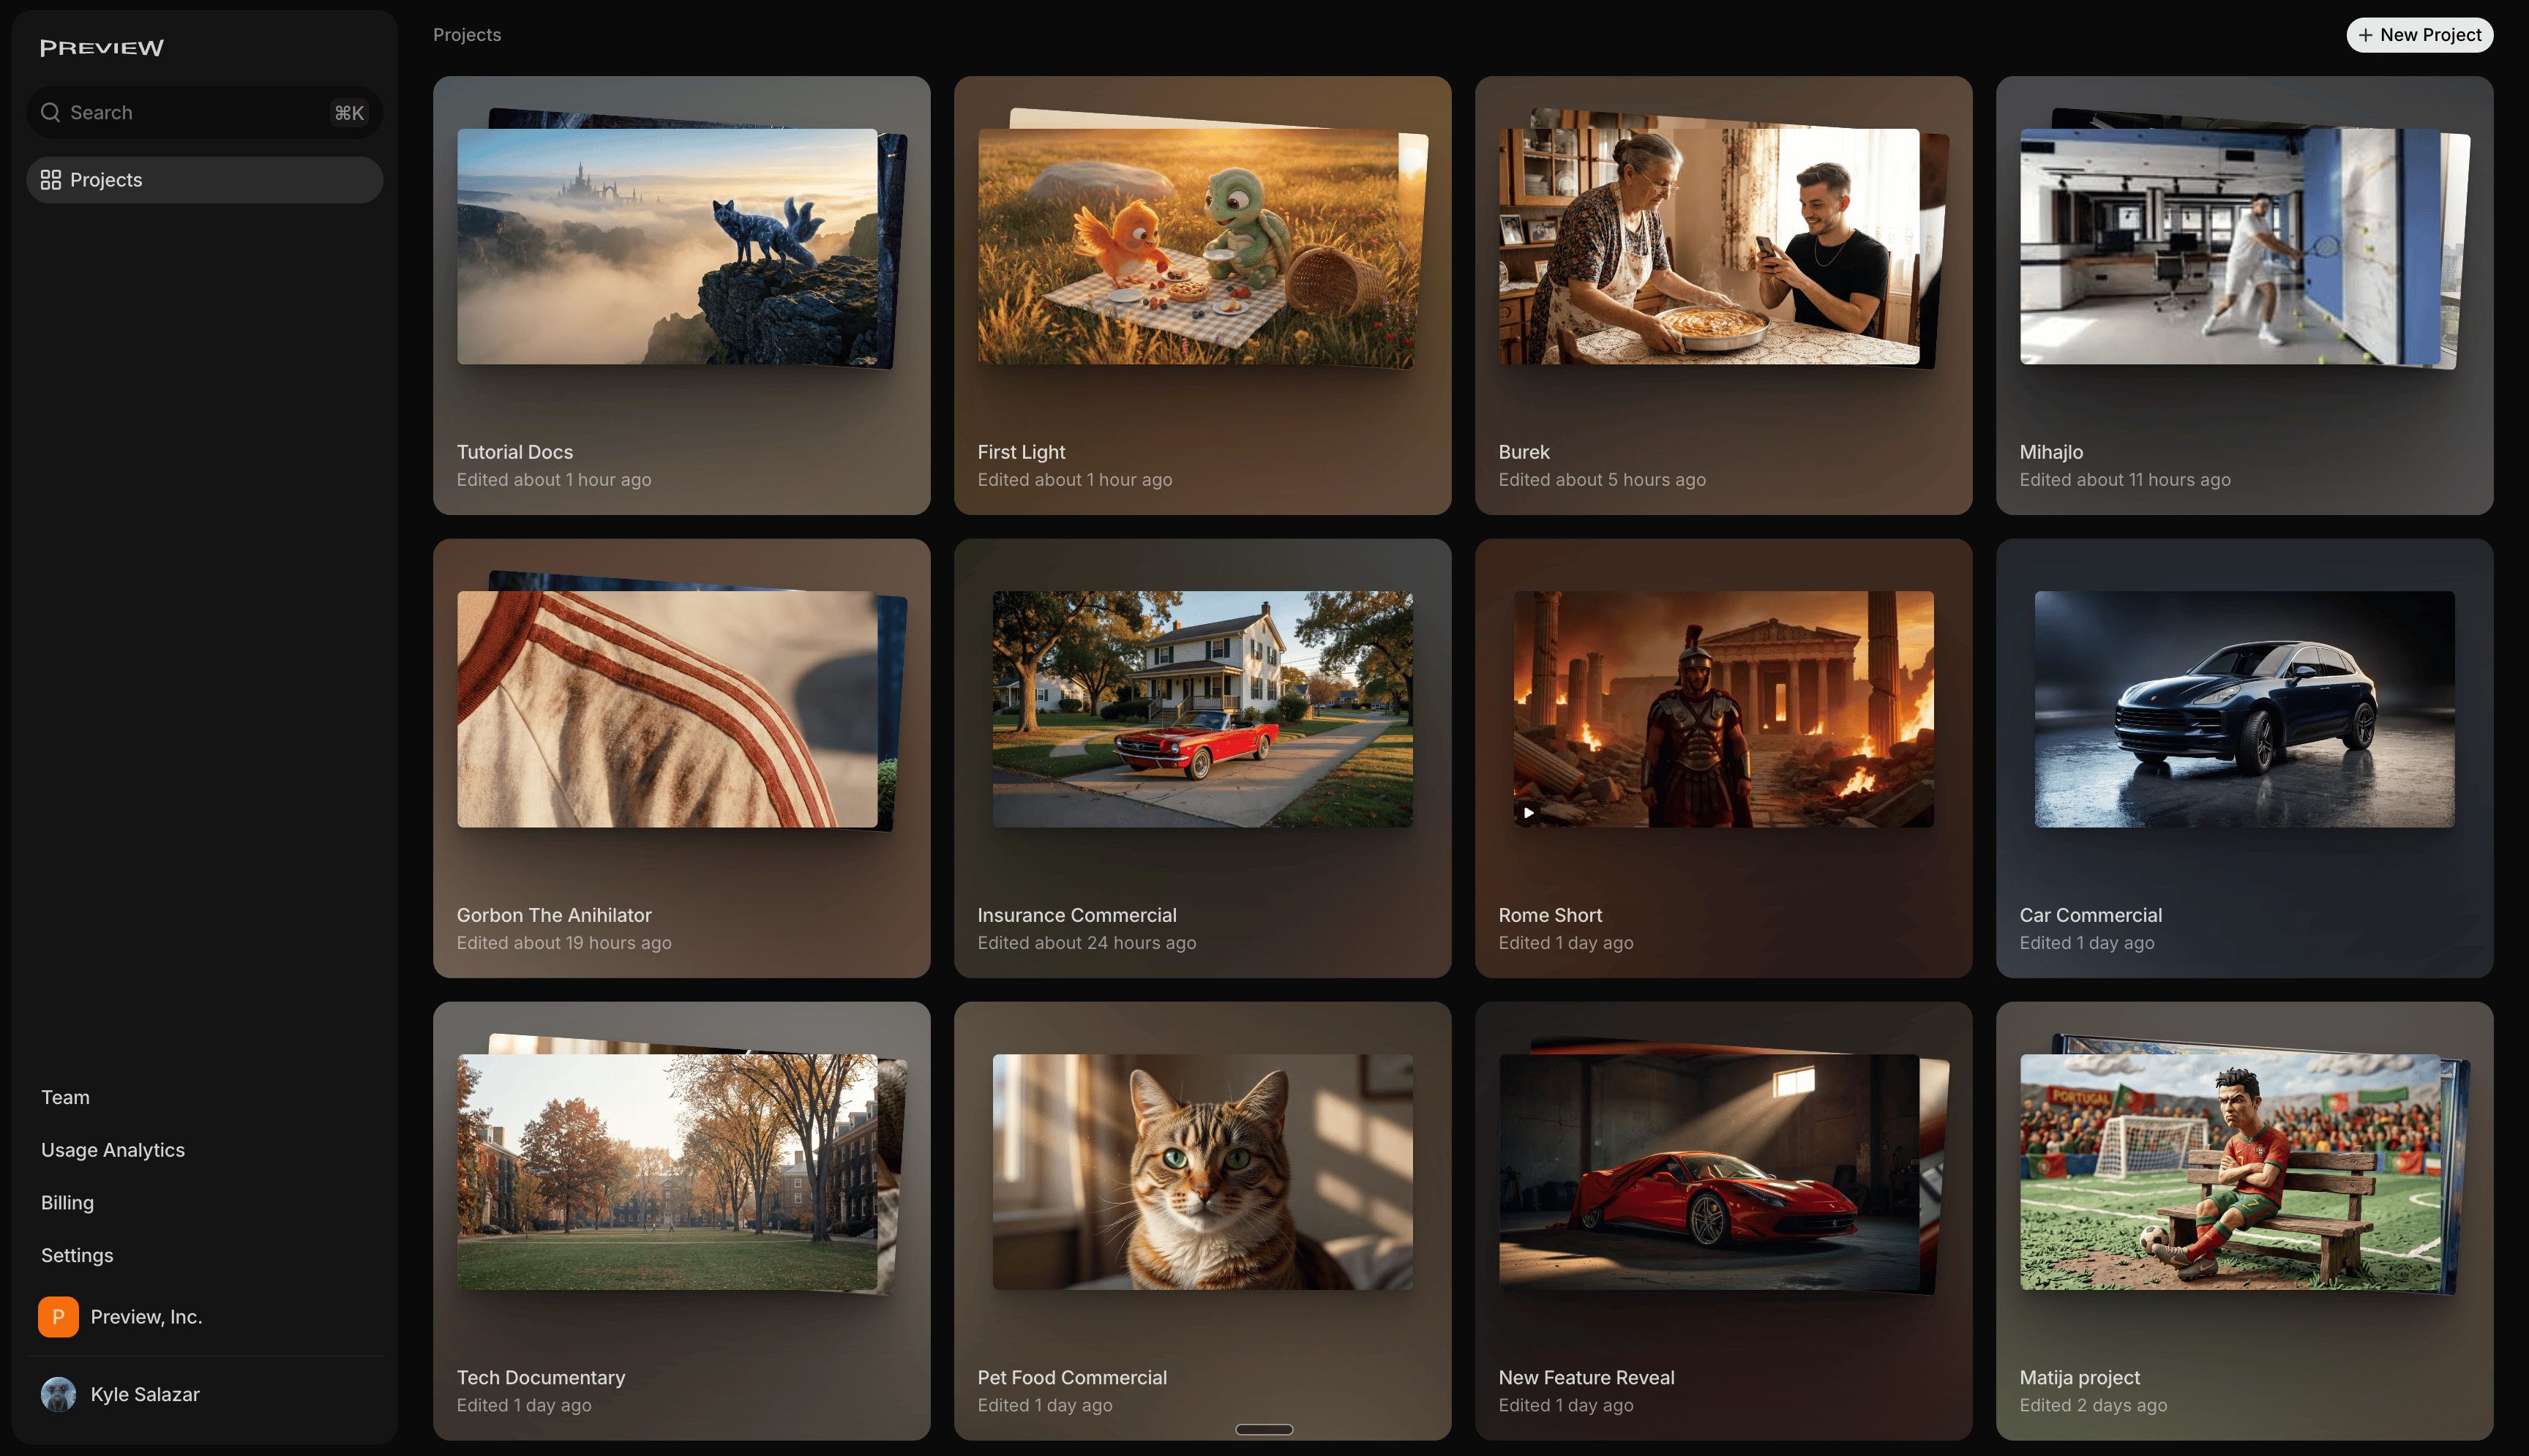 An infinite, multiplayer workspace. Everyone on the project can see and generate here together, in real time.
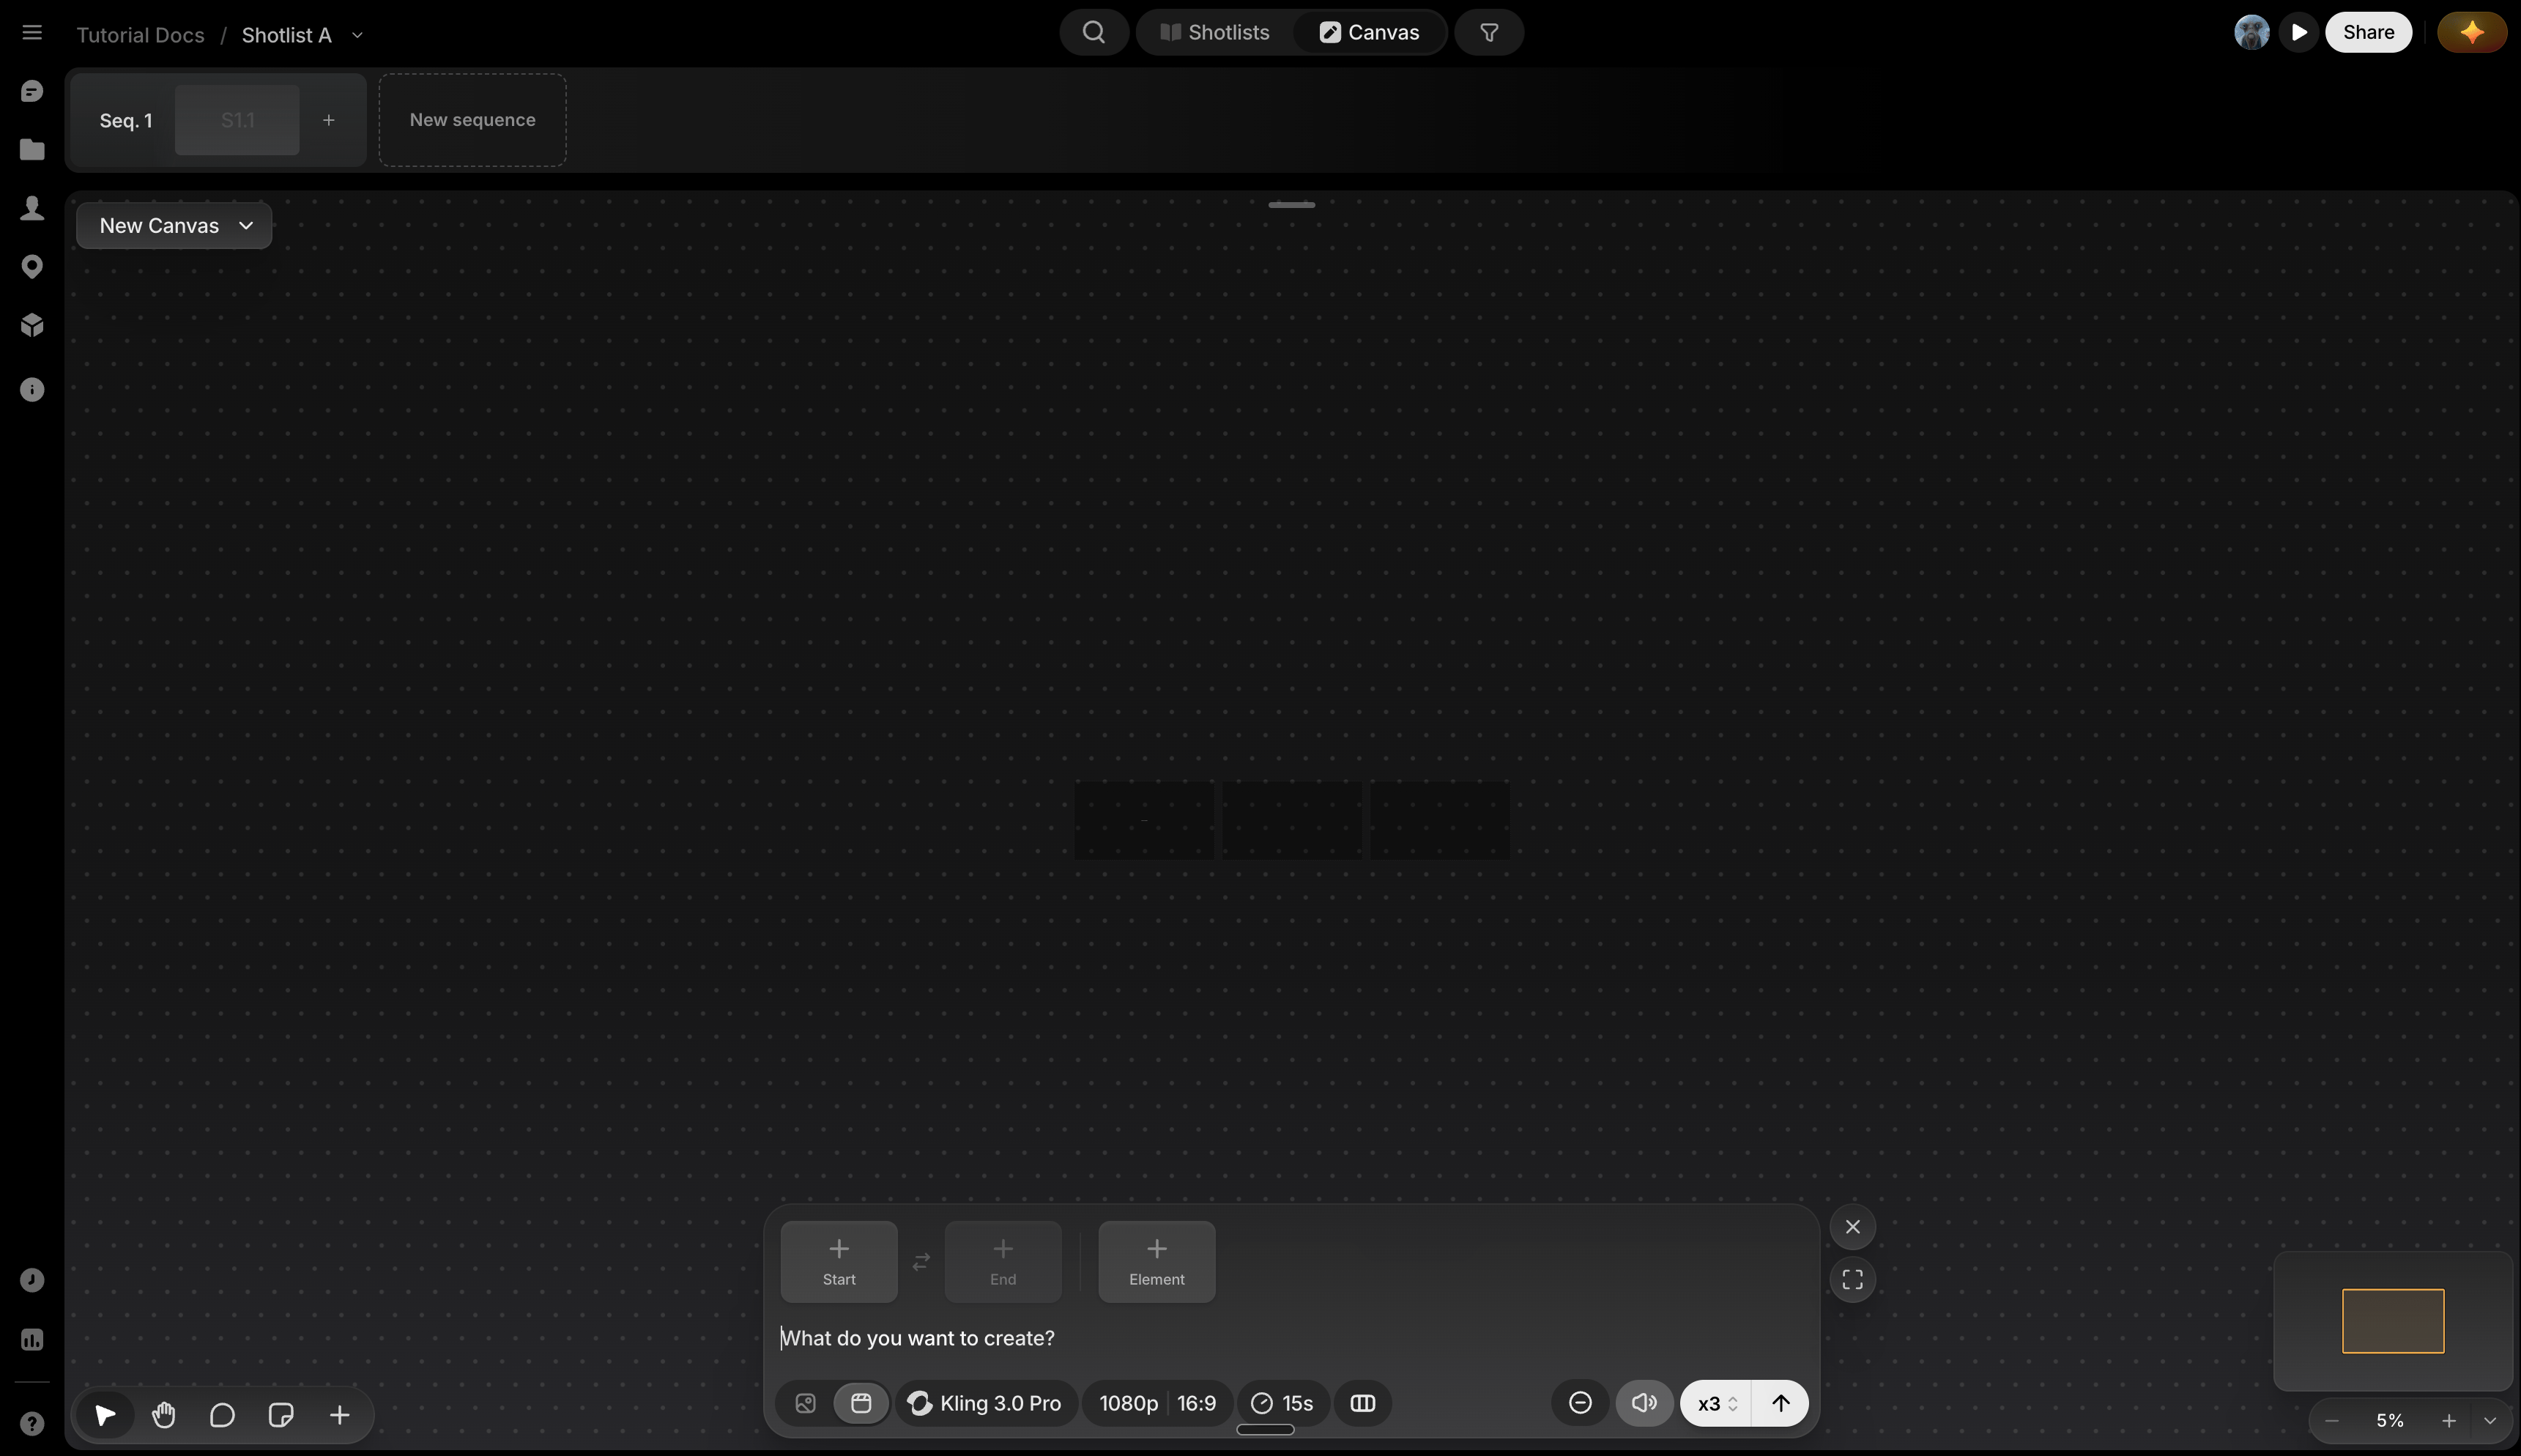 Two ways to make something:
* **[Prompt box](/preview/prompt-box-overview)** (bottom of the canvas): write what you want, pick a model, and generate directly.
Two ways to make something:
* **[Prompt box](/preview/prompt-box-overview)** (bottom of the canvas): write what you want, pick a model, and generate directly.
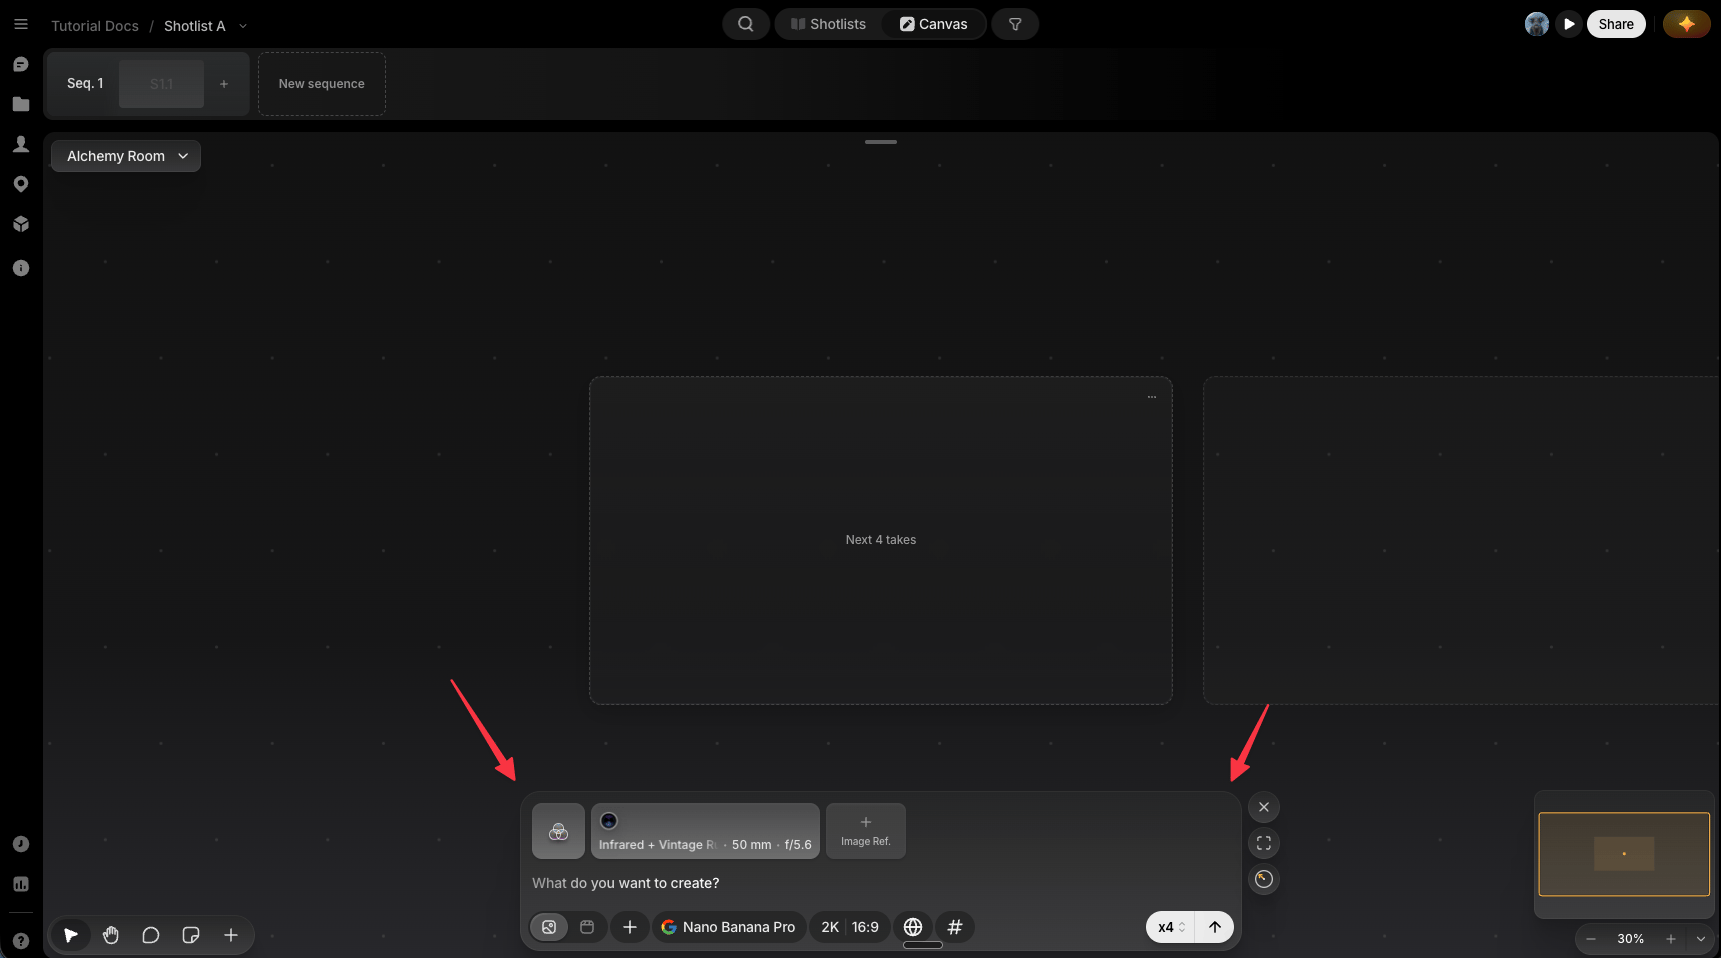 * **[Preview Agent](/preview/agent)**: describe what you want in chat and let it build it for you.
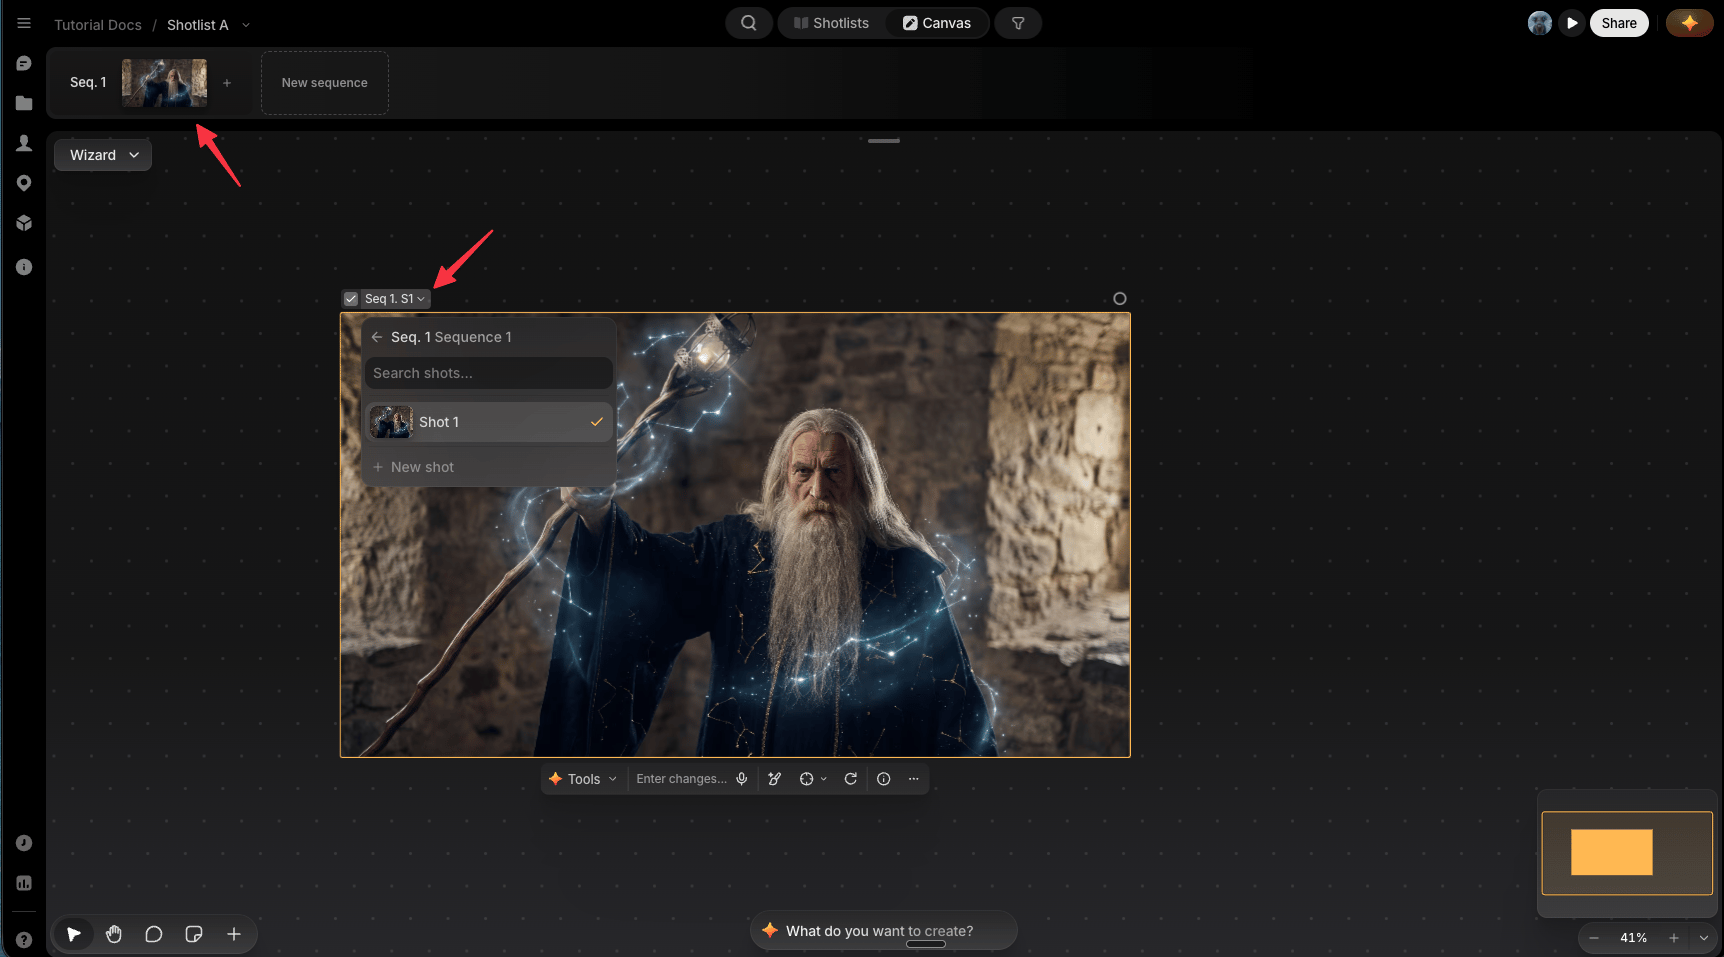
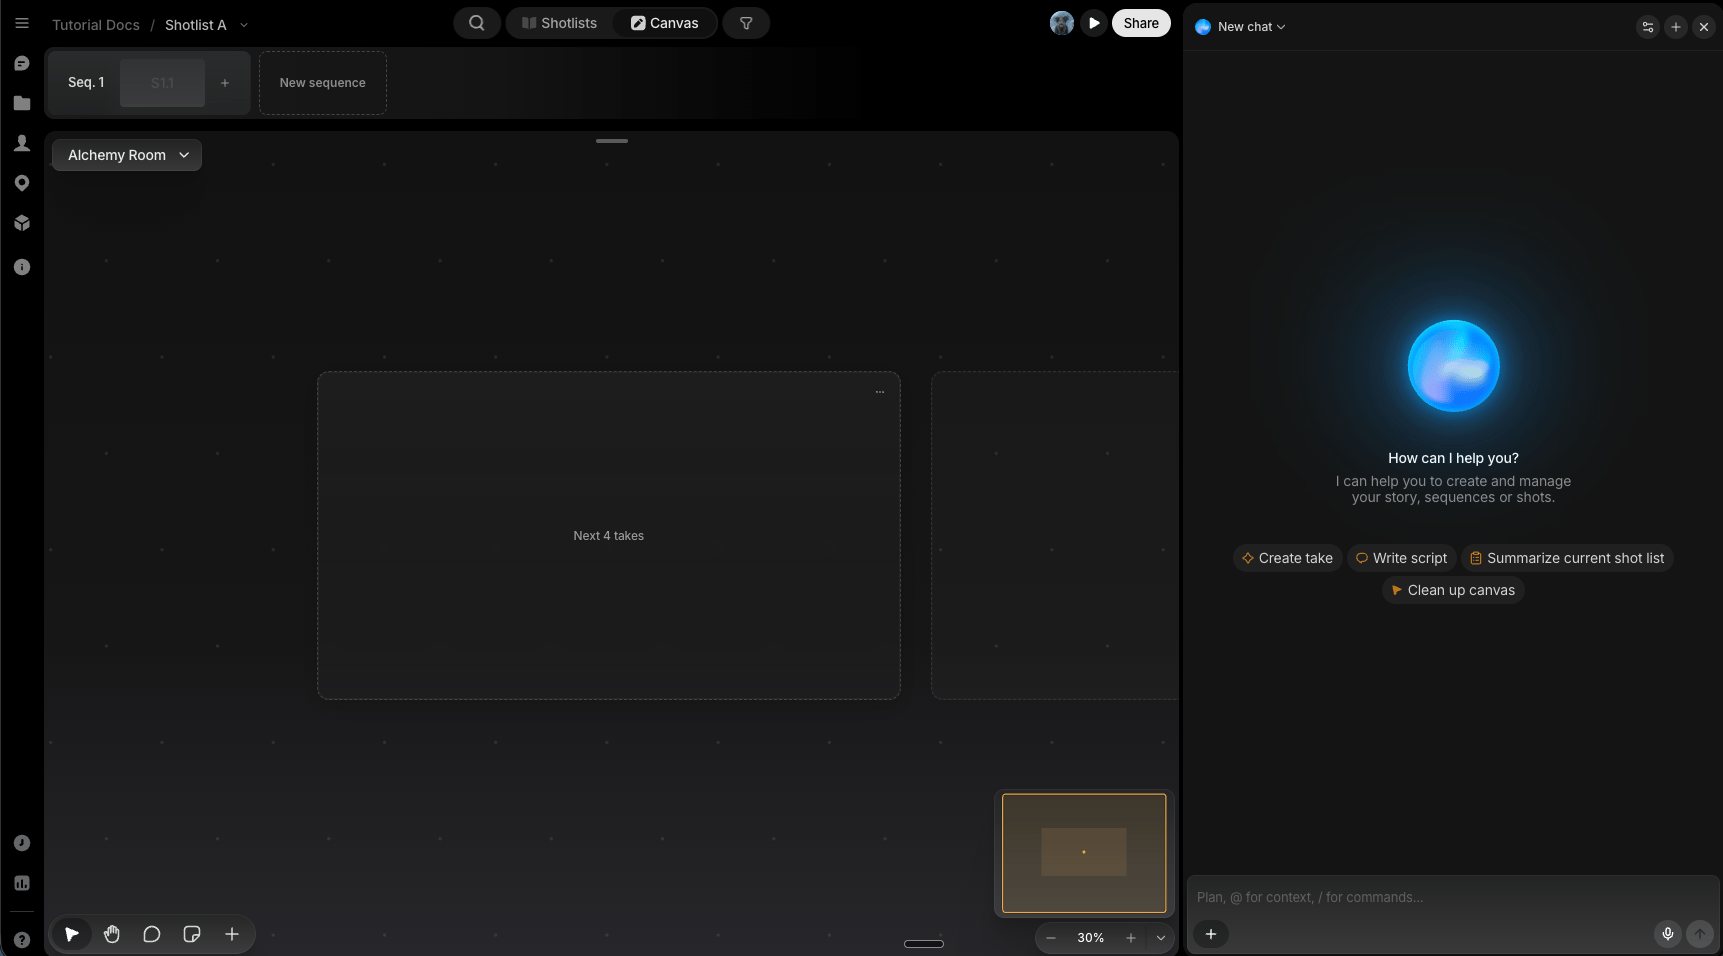 The **[Sequence Timeline](/preview/scene-timeline)** sits at the top of your canvas. Assign a file to a shot (a slot for one piece of your story) and it lands there immediately, so your sequences (the scene groupings that make up a shot list) take shape as you generate.
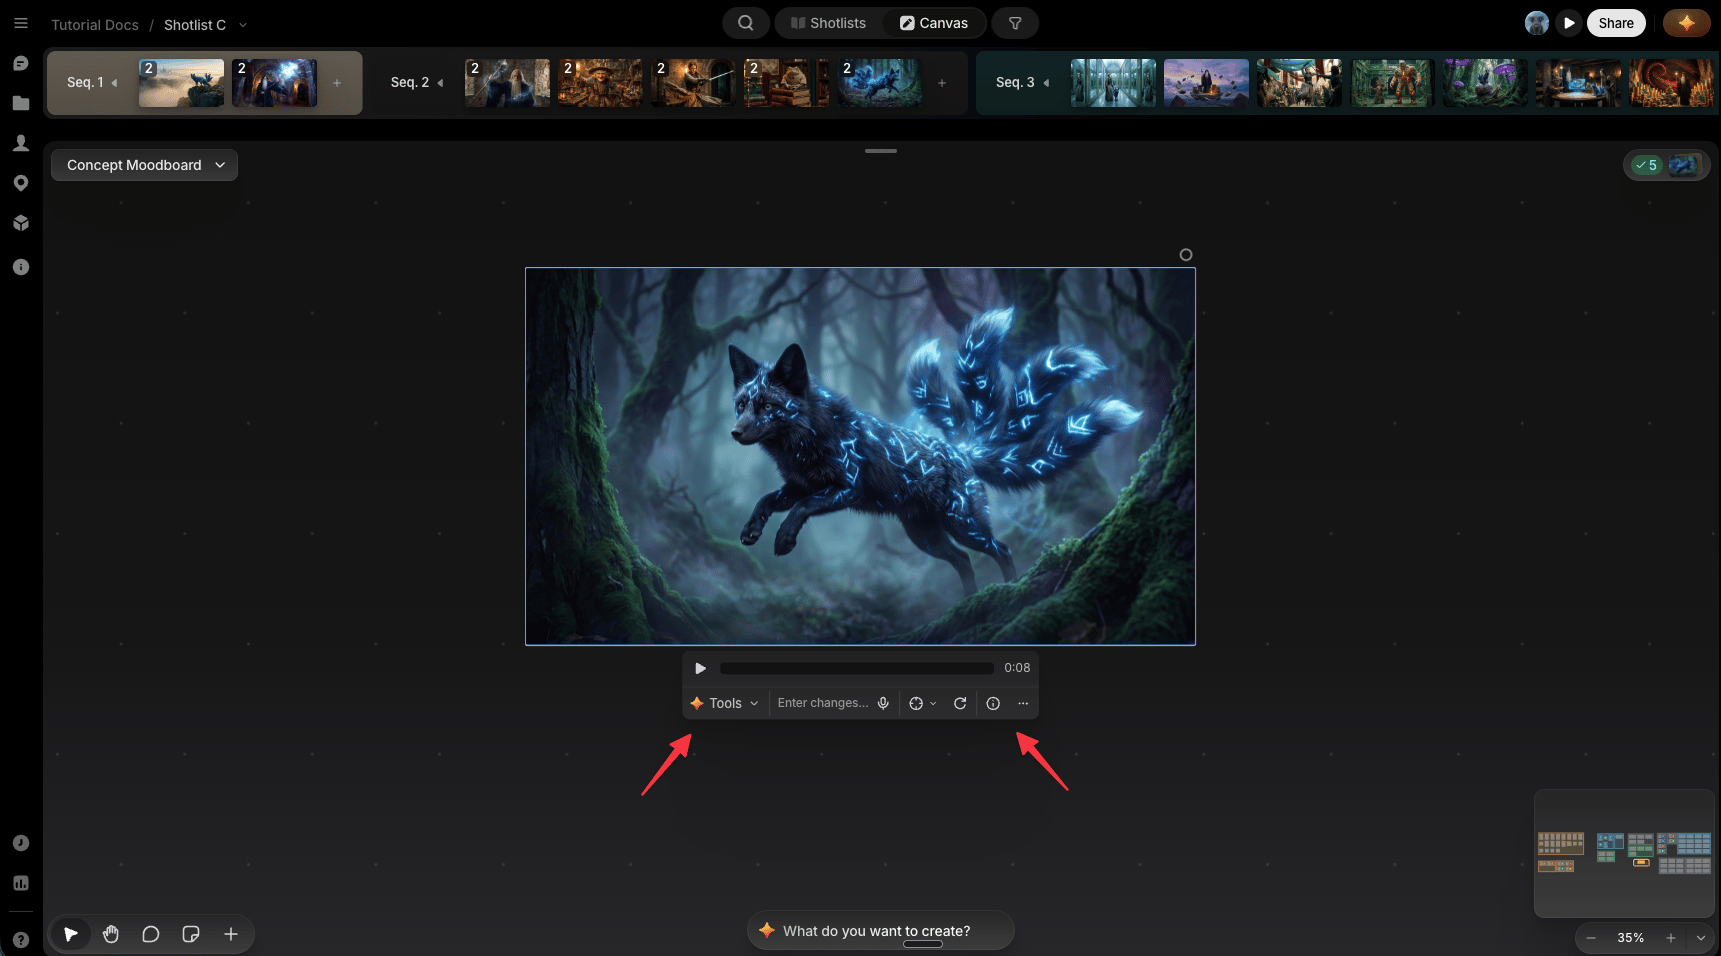
 Click any file on canvas to bring up its **toolbar**: iterate on it with Quick Actions or Preview Agent, inpaint part of it, reuse its prompt, or add it as a reference, all without leaving the canvas. See [File Toolbar](/preview/file-toolbar#the-toolbar).
 ## Scale up: more canvases, more shot lists
Two different ways to expand a project and stay organized:
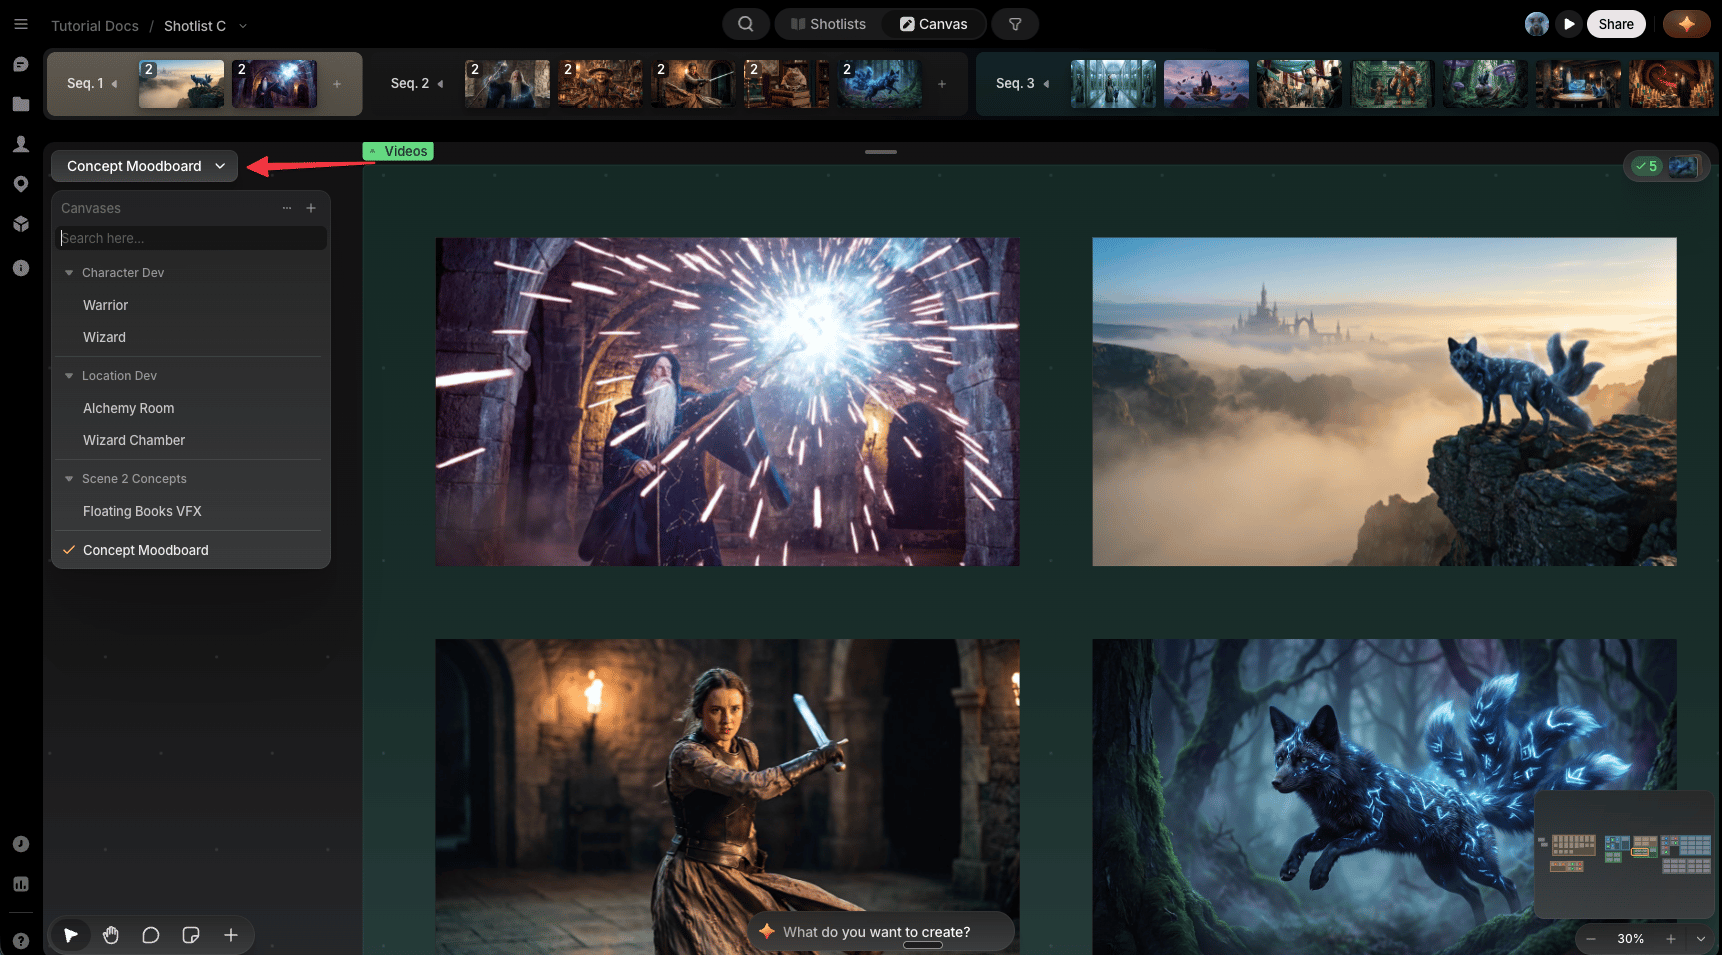
* **[Canvases](/preview/canvas-overview)**: from the picker in the top-left corner of Studio, create as many as you need. Canvases belong to the project, not any one sequence, so use one per part of the project, or a scratch space to experiment visually.
## Scale up: more canvases, more shot lists
Two different ways to expand a project and stay organized:
* **[Canvases](/preview/canvas-overview)**: from the picker in the top-left corner of Studio, create as many as you need. Canvases belong to the project, not any one sequence, so use one per part of the project, or a scratch space to experiment visually.
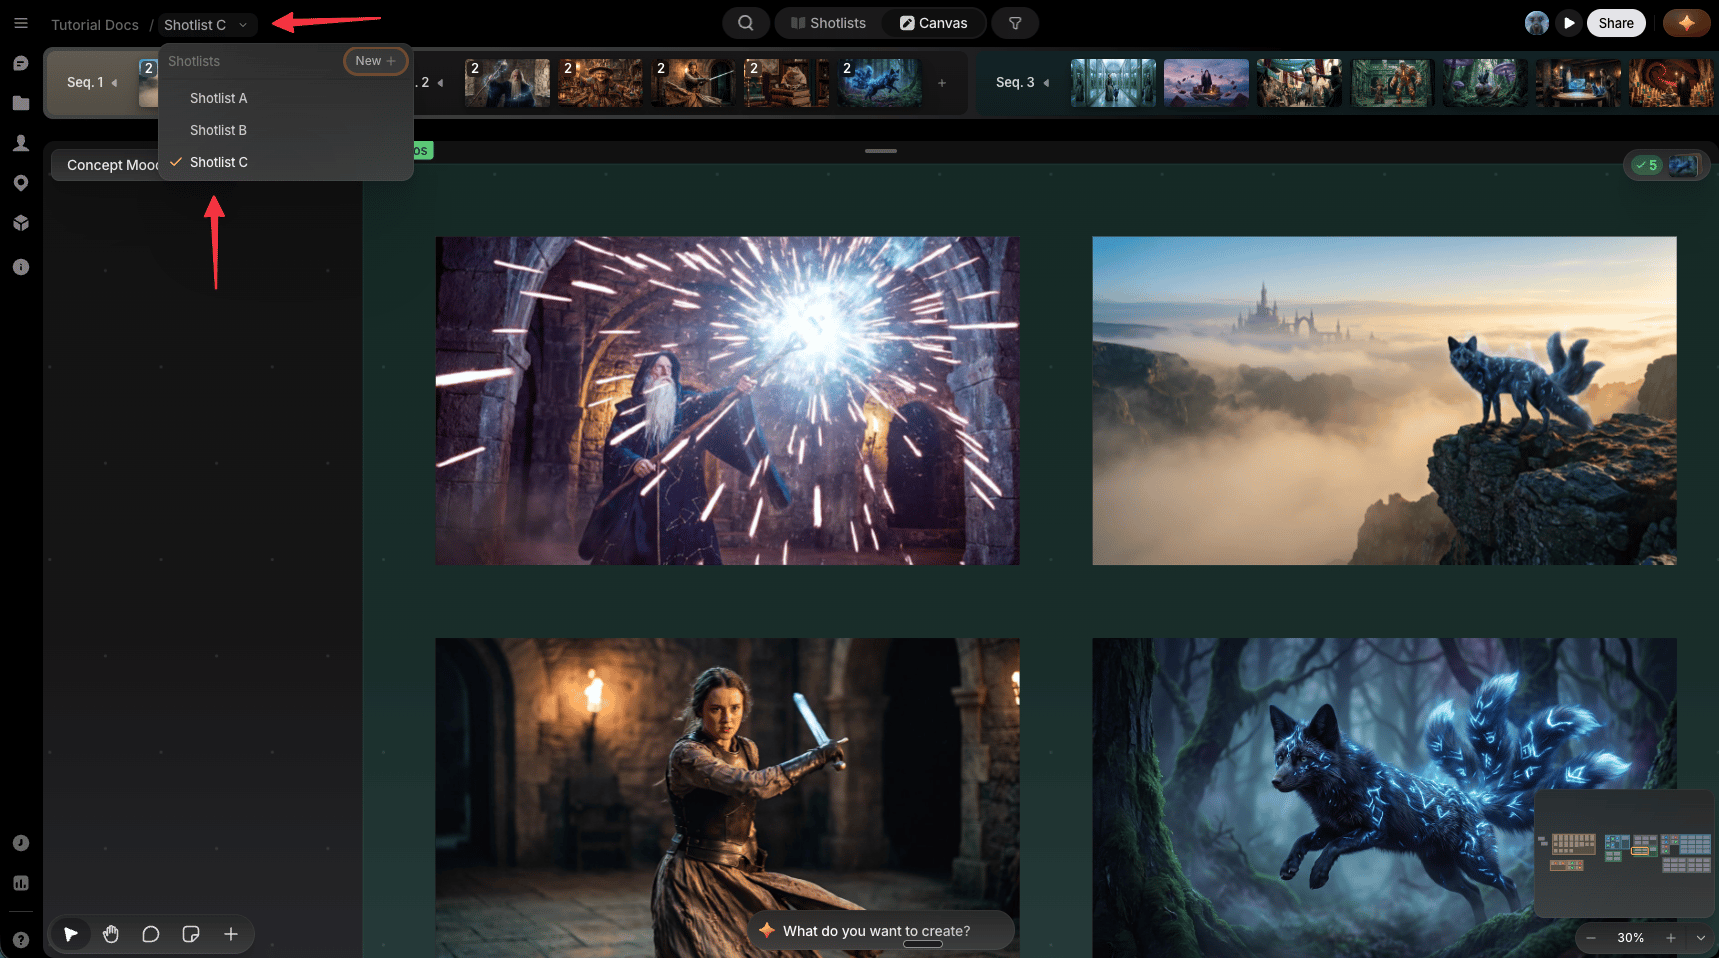
 * **[Shot lists](/preview/shotlists-overview)**: a project can hold multiple shot lists, each an independent set of sequences. You can use them to version sequences or track side ideas without touching your main cut.
 ## Stay consistent
Before you're deep into managing shots, it's worth saving anything you'll reuse: a character's face, a location, a prop. Save it once and call it back into any prompt instead of re-describing it from scratch.
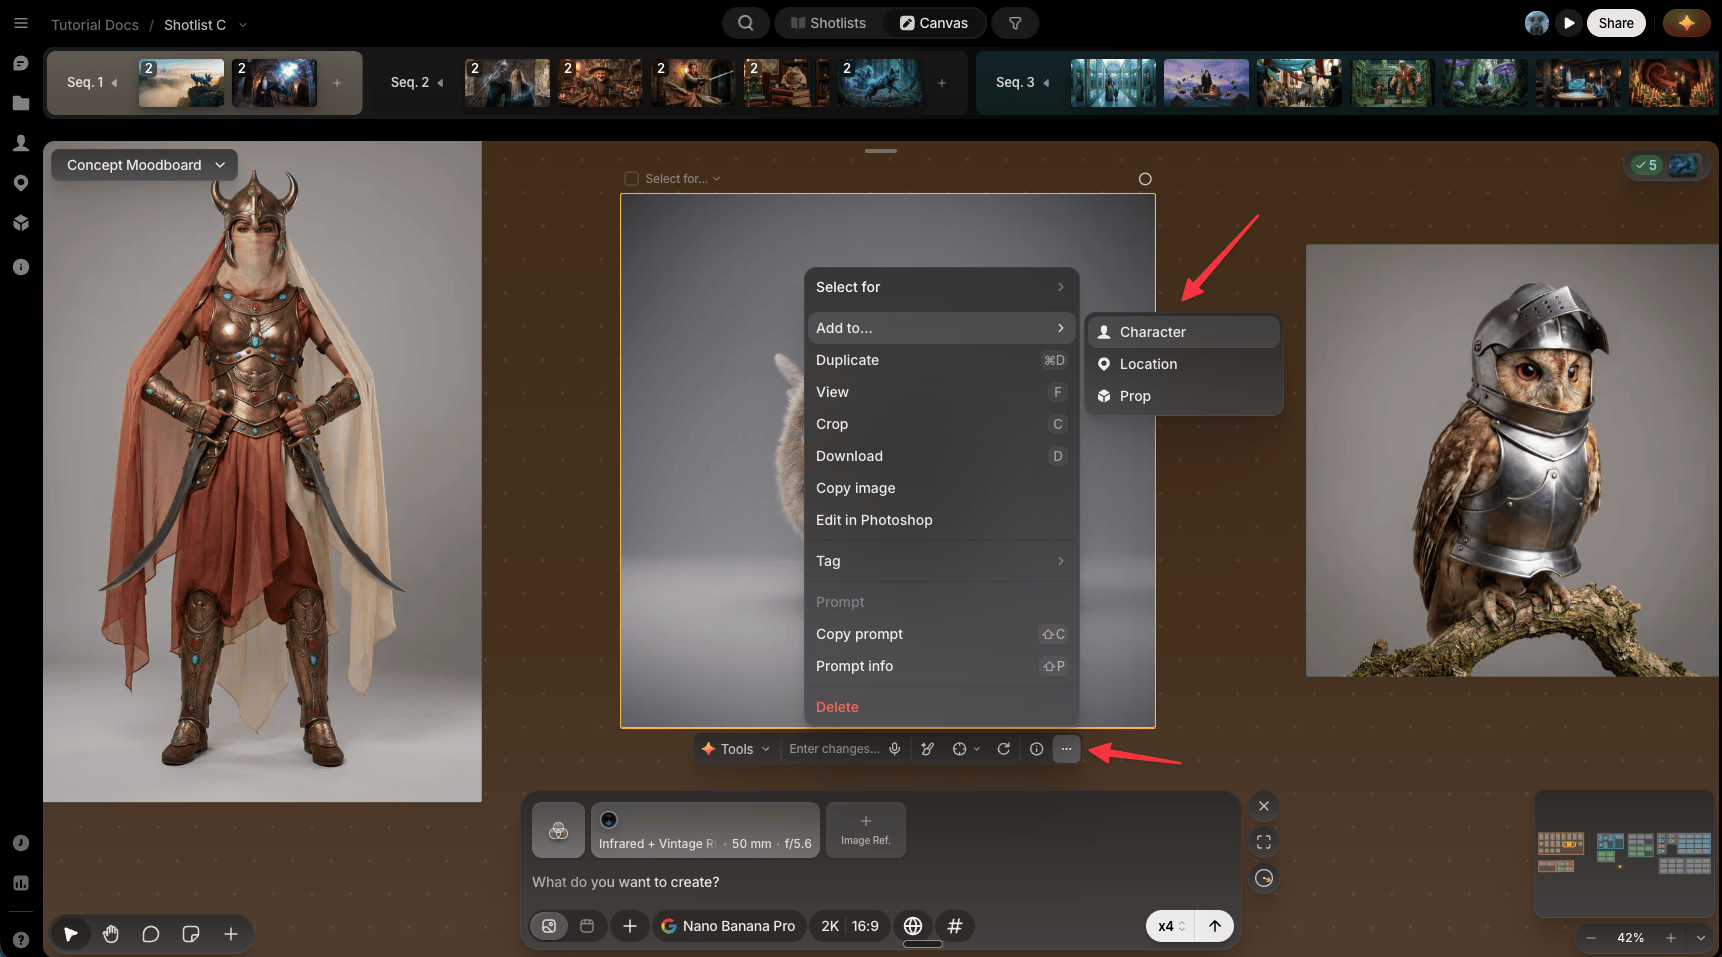
* **Save it**: right-click an image on canvas or use its three-dot menu on the toolbar and choose **Add to...** to save it as a Character, Location, or Prop.
## Stay consistent
Before you're deep into managing shots, it's worth saving anything you'll reuse: a character's face, a location, a prop. Save it once and call it back into any prompt instead of re-describing it from scratch.
* **Save it**: right-click an image on canvas or use its three-dot menu on the toolbar and choose **Add to...** to save it as a Character, Location, or Prop.
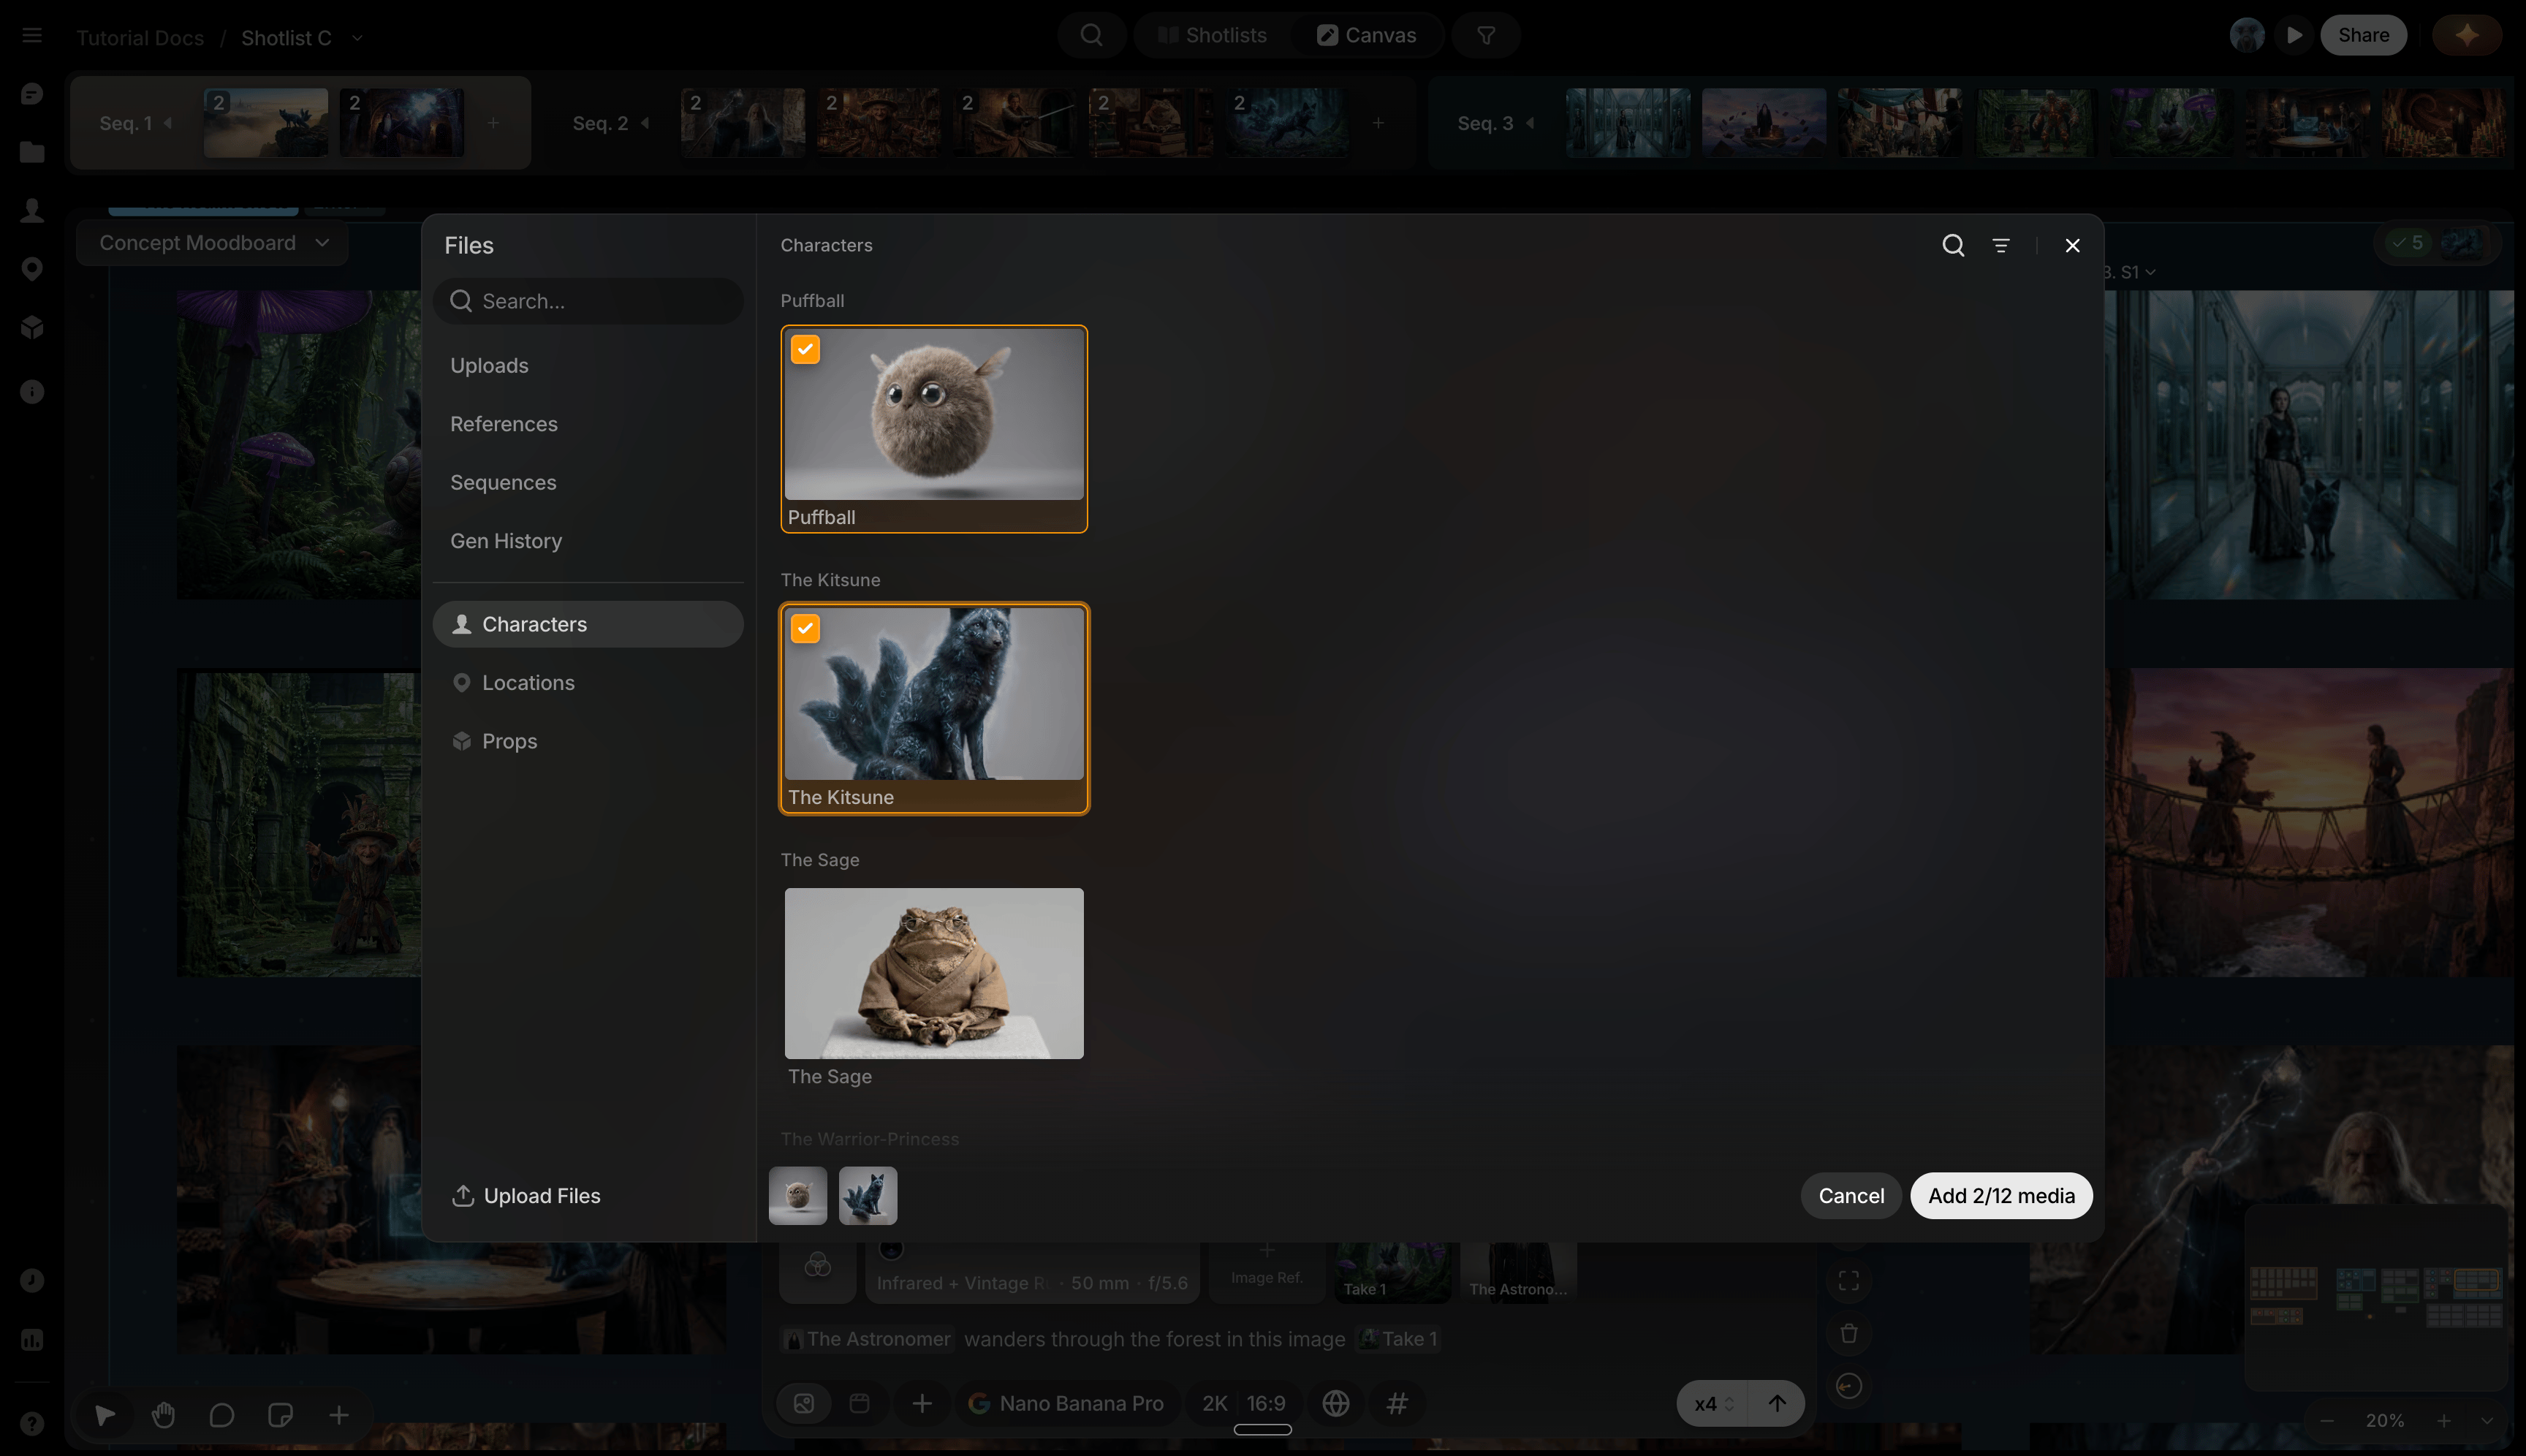
 * **Library**: everything you save collects here, all in one place, organized by Character, Location, and Prop. See [Project Library](/preview/project-library).
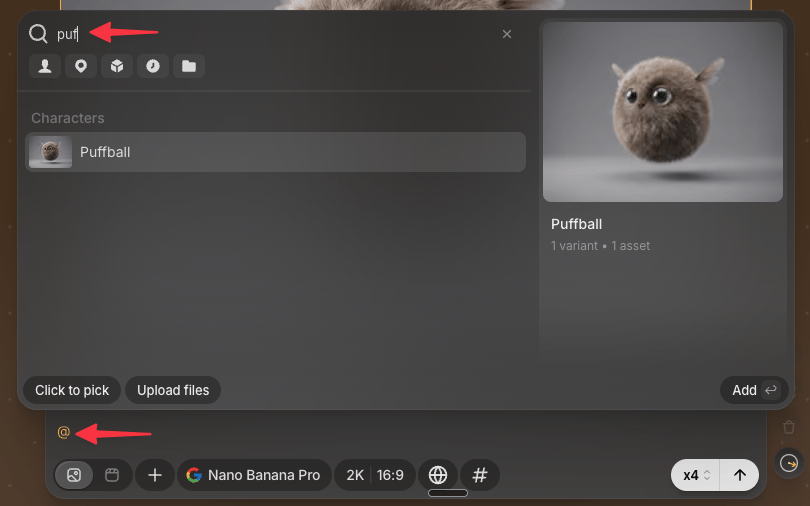
 * **Reference it**: type `@` in any prompt to pull a saved Character, Location, or Prop back in, same face, same set, same object, every time. See [Referencing with @](/preview/at-references).
 ## Manage it all in Production
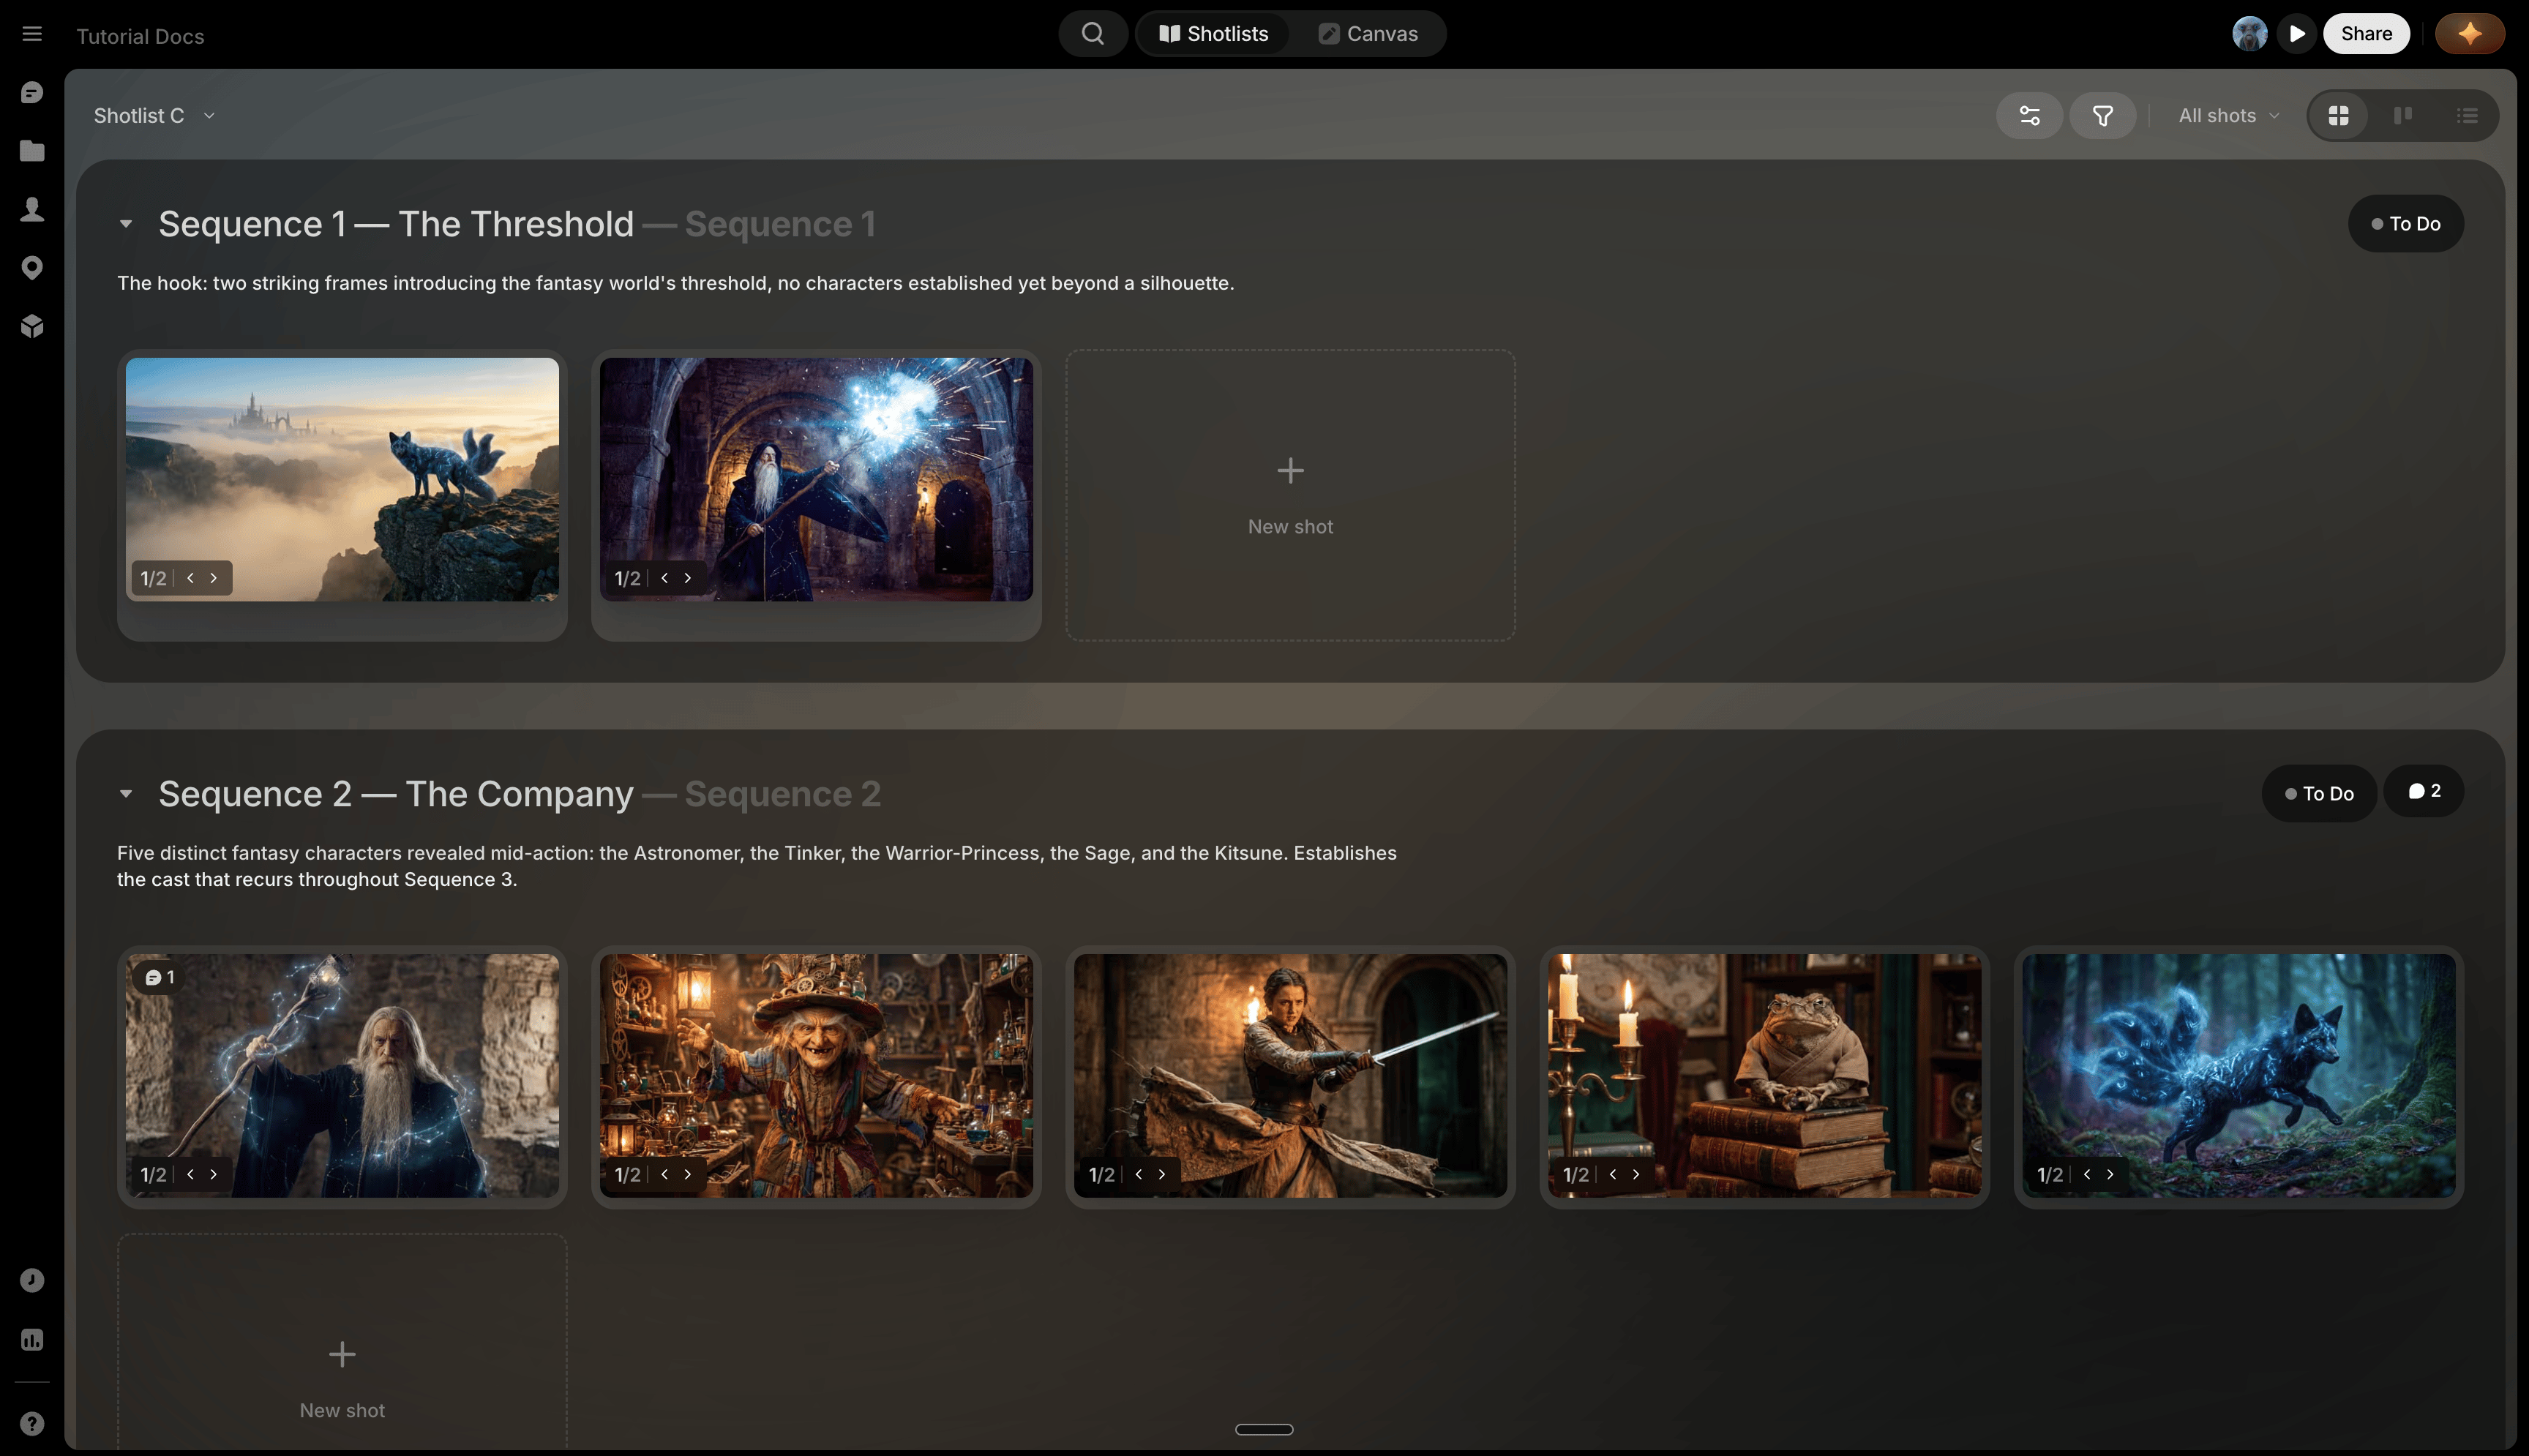
Once there's real structure to track, click **[Production](/preview/shotlists-overview)** at the top of the screen, beside Studio.
* **Shotlist** and **Storyboard**: detailed metadata, shot-by-shot breakdown.
* **Kanban**: where your team tracks status at a glance and moves work through pipelines.
All three stay synced live, and so does the canvas. Change something in one place and it updates everywhere.
## Manage it all in Production
Once there's real structure to track, click **[Production](/preview/shotlists-overview)** at the top of the screen, beside Studio.
* **Shotlist** and **Storyboard**: detailed metadata, shot-by-shot breakdown.
* **Kanban**: where your team tracks status at a glance and moves work through pipelines.
All three stay synced live, and so does the canvas. Change something in one place and it updates everywhere.
 ## Always within reach
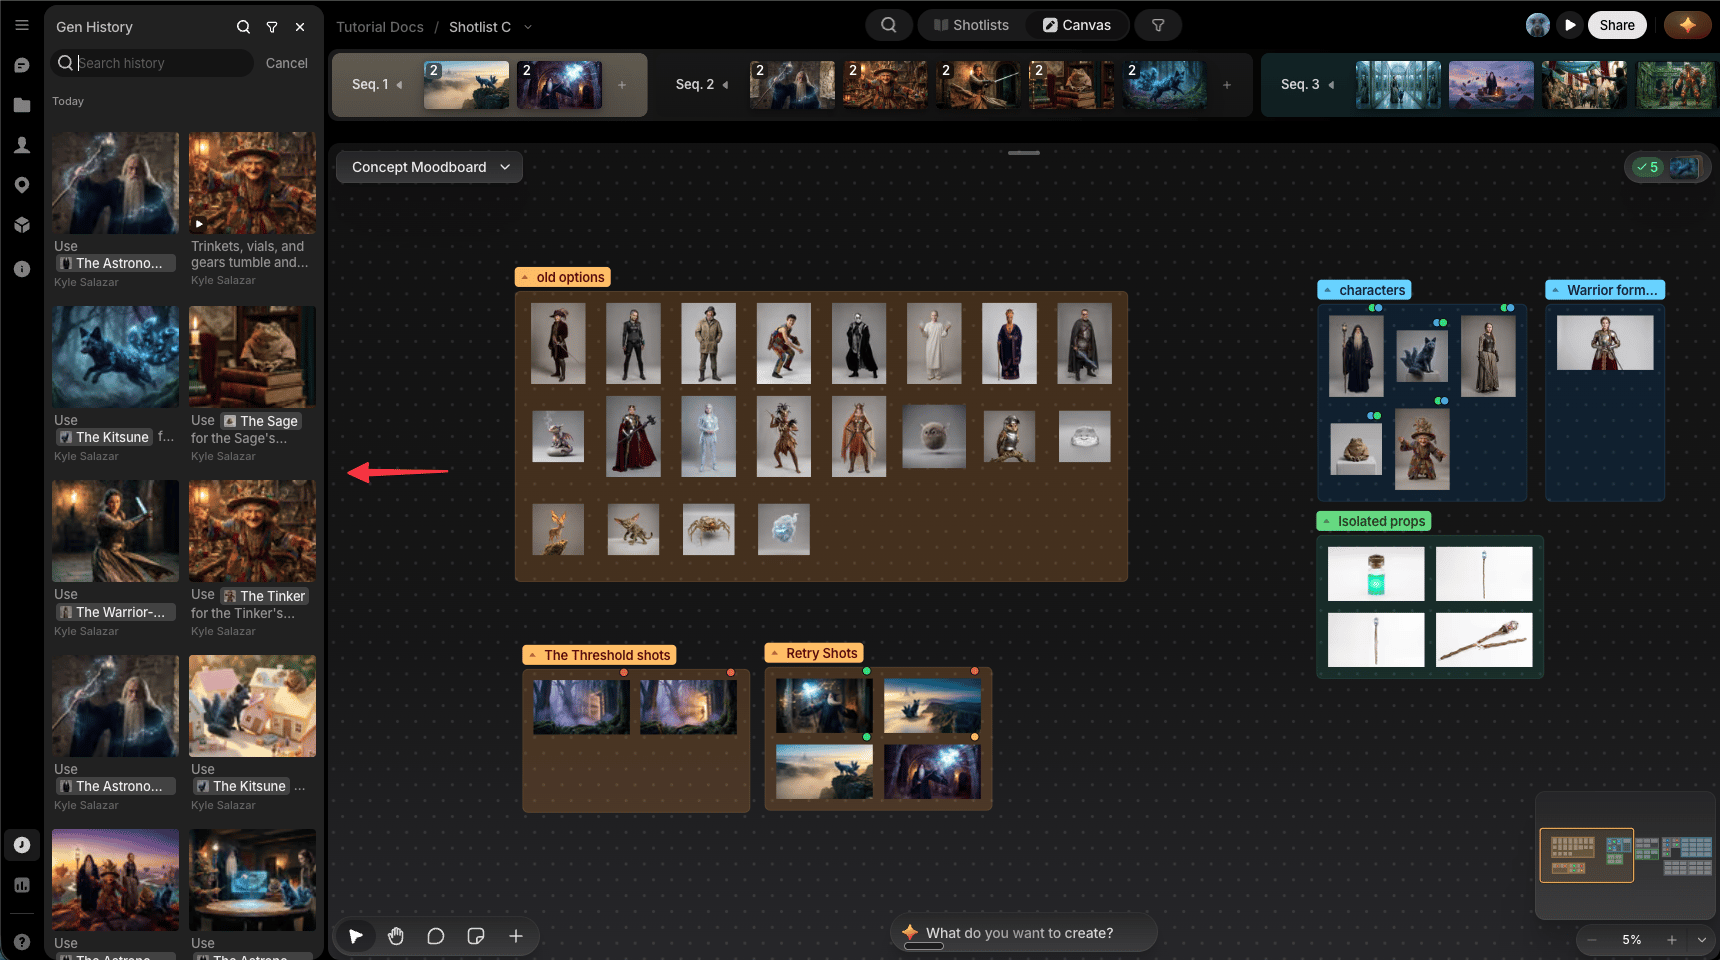
* **[History](/preview/history)**: every file ever created or imported in the project, always browsable, filterable by who made it. Click the **History** icon in the left sidebar to open it.
## Always within reach
* **[History](/preview/history)**: every file ever created or imported in the project, always browsable, filterable by who made it. Click the **History** icon in the left sidebar to open it.
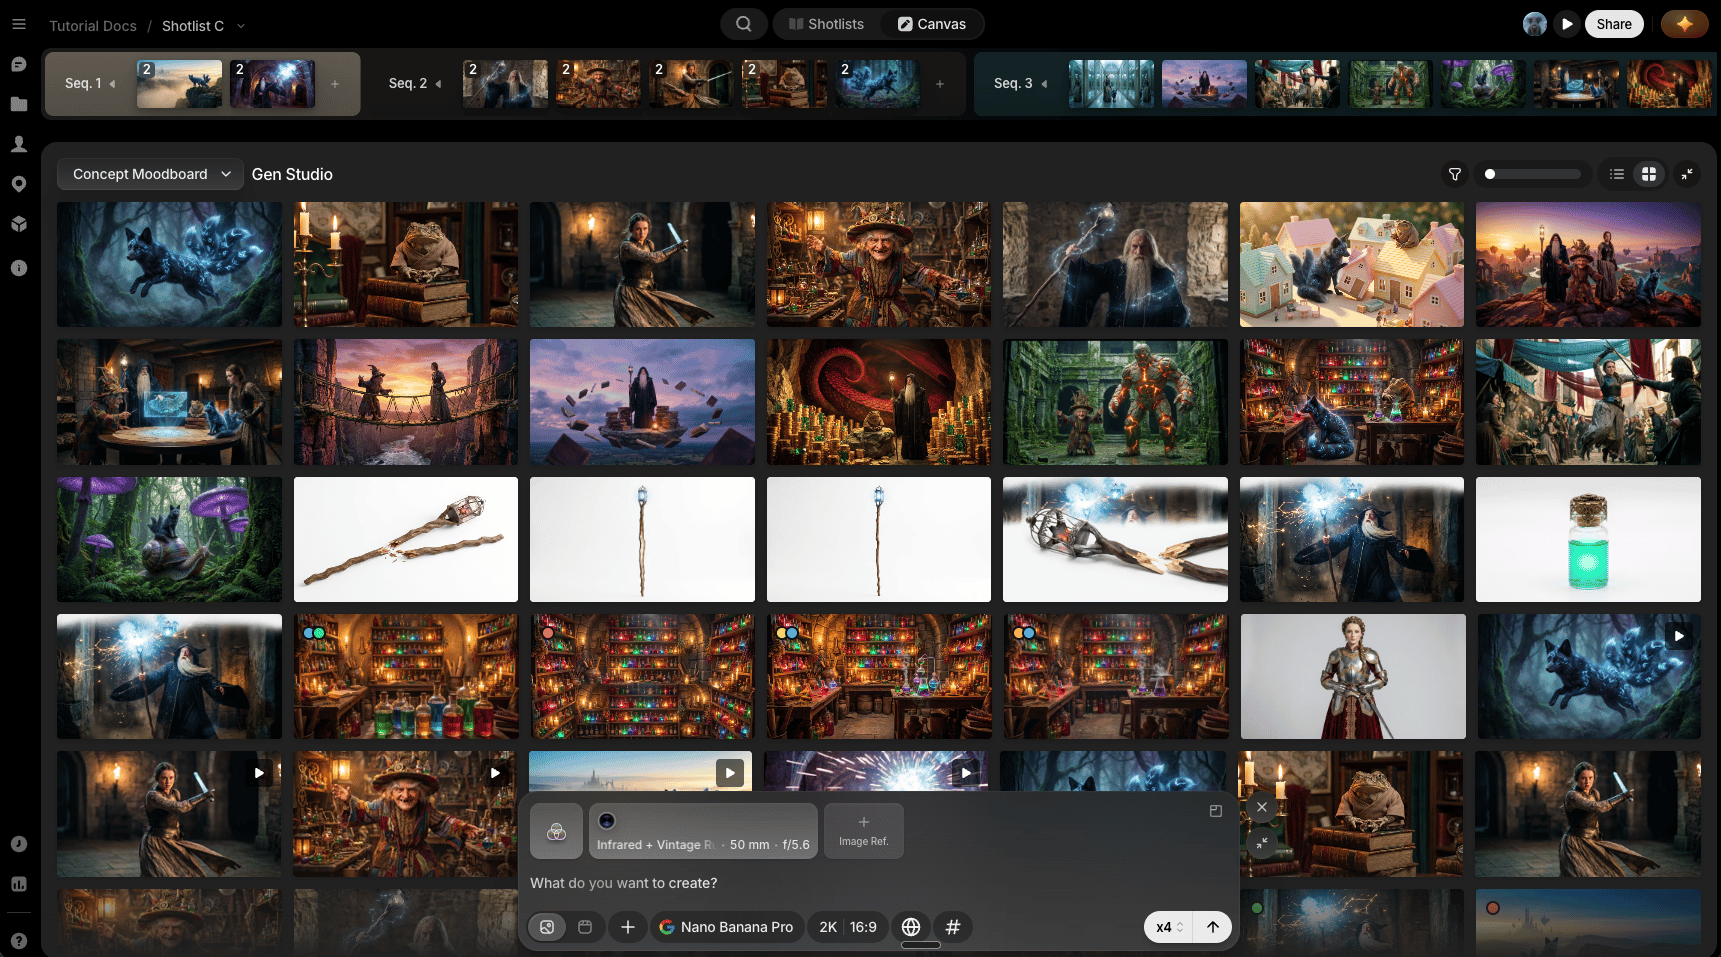
 * **[Files view](/preview/canvas-overview#files-view)**: flip any canvas into a live feed of everything generated on it, for reviewing a batch before deciding what's worth placing. Switch to it from the **Files view** tab on the canvas pill, top left.
 ## Share your work
When a project's ready for eyes outside your own, share it two ways from the **Share** button in the app's upper-right corner.
## Share your work
When a project's ready for eyes outside your own, share it two ways from the **Share** button in the app's upper-right corner.
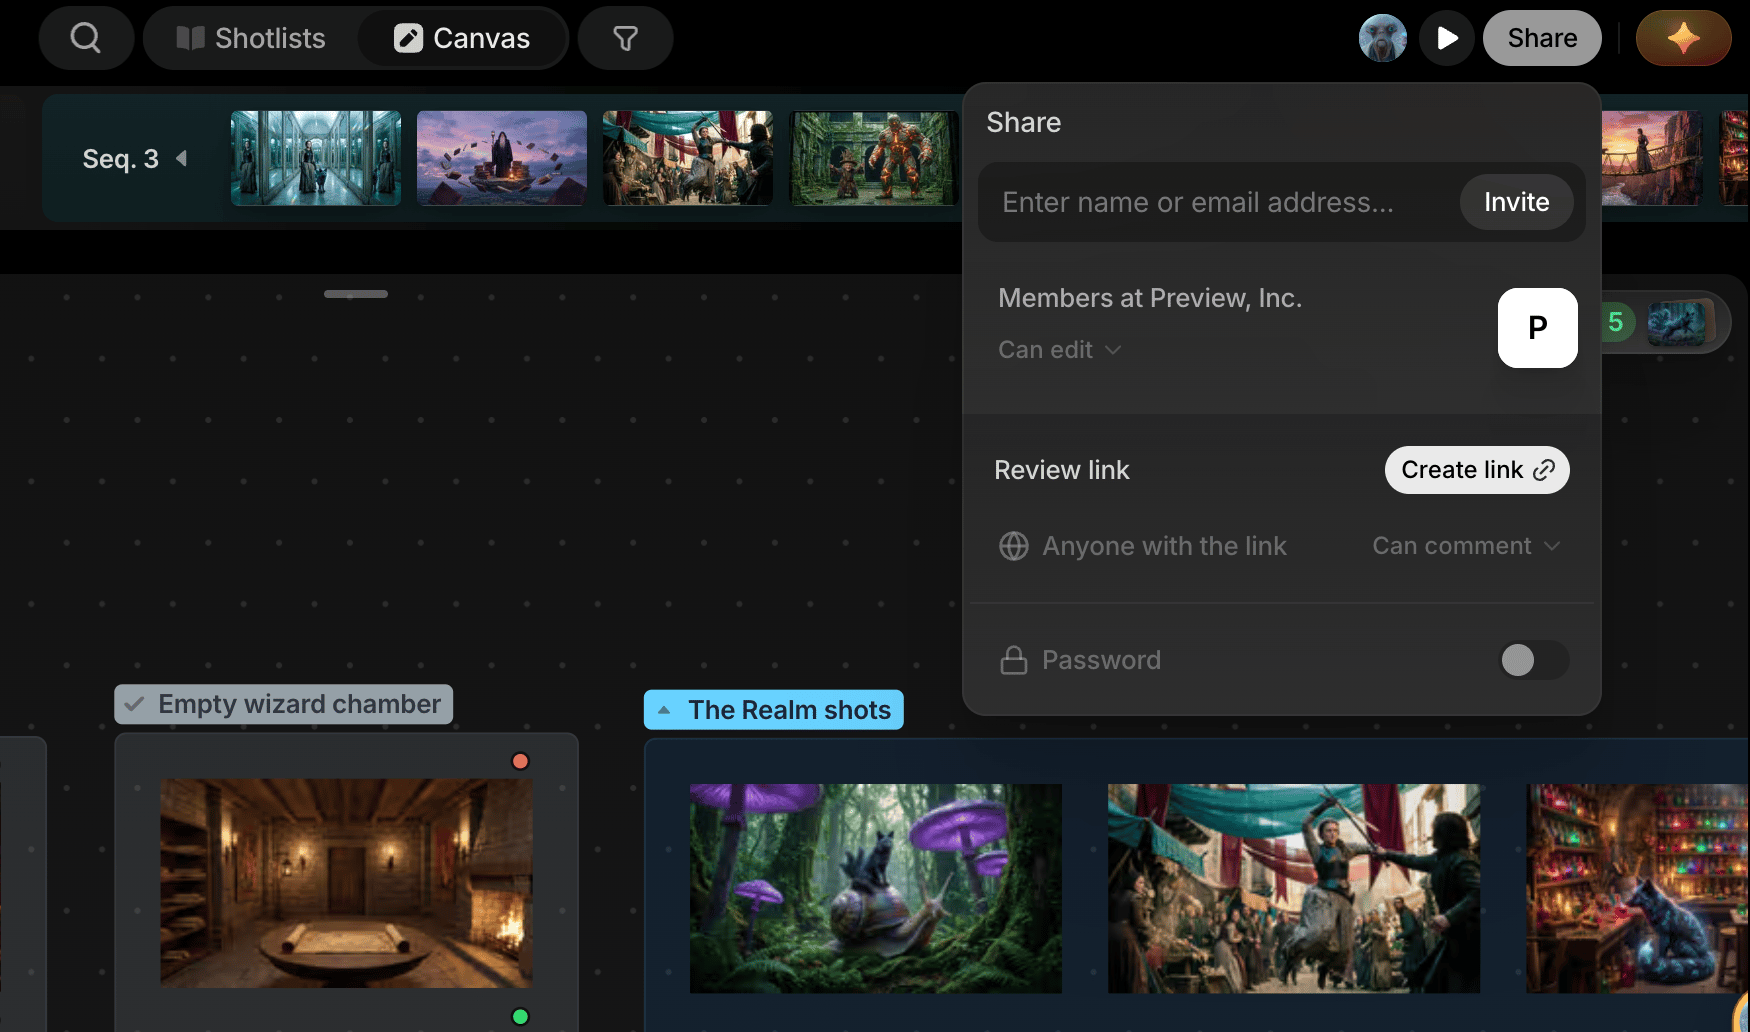 * **[Invite a collaborator](/preview/sharing#collaborator-invites)**: add someone by email with a role (Can edit, Can comment, Can view). They'll need a Preview account and get real access, for people doing actual work in the project with you.
* **[Send a review link](/preview/sharing#review-link)**: no account needed, just a link. Anyone who has it can browse the project and leave comments, perfect for clients and stakeholders who just need to see the work and weigh in.
## Export
The last piece: take everything you've built and move it into an editing system, either by right-clicking a sequence and choosing **Export sequence** for just that one, or from the Project menu's hamburger icon, choosing **Export** for everything in your active shot list. Either way, you get an FCPXML timeline for Final Cut Pro or DaVinci Resolve, ready to keep working with outside Preview.
* **[Invite a collaborator](/preview/sharing#collaborator-invites)**: add someone by email with a role (Can edit, Can comment, Can view). They'll need a Preview account and get real access, for people doing actual work in the project with you.
* **[Send a review link](/preview/sharing#review-link)**: no account needed, just a link. Anyone who has it can browse the project and leave comments, perfect for clients and stakeholders who just need to see the work and weigh in.
## Export
The last piece: take everything you've built and move it into an editing system, either by right-clicking a sequence and choosing **Export sequence** for just that one, or from the Project menu's hamburger icon, choosing **Export** for everything in your active shot list. Either way, you get an FCPXML timeline for Final Cut Pro or DaVinci Resolve, ready to keep working with outside Preview.
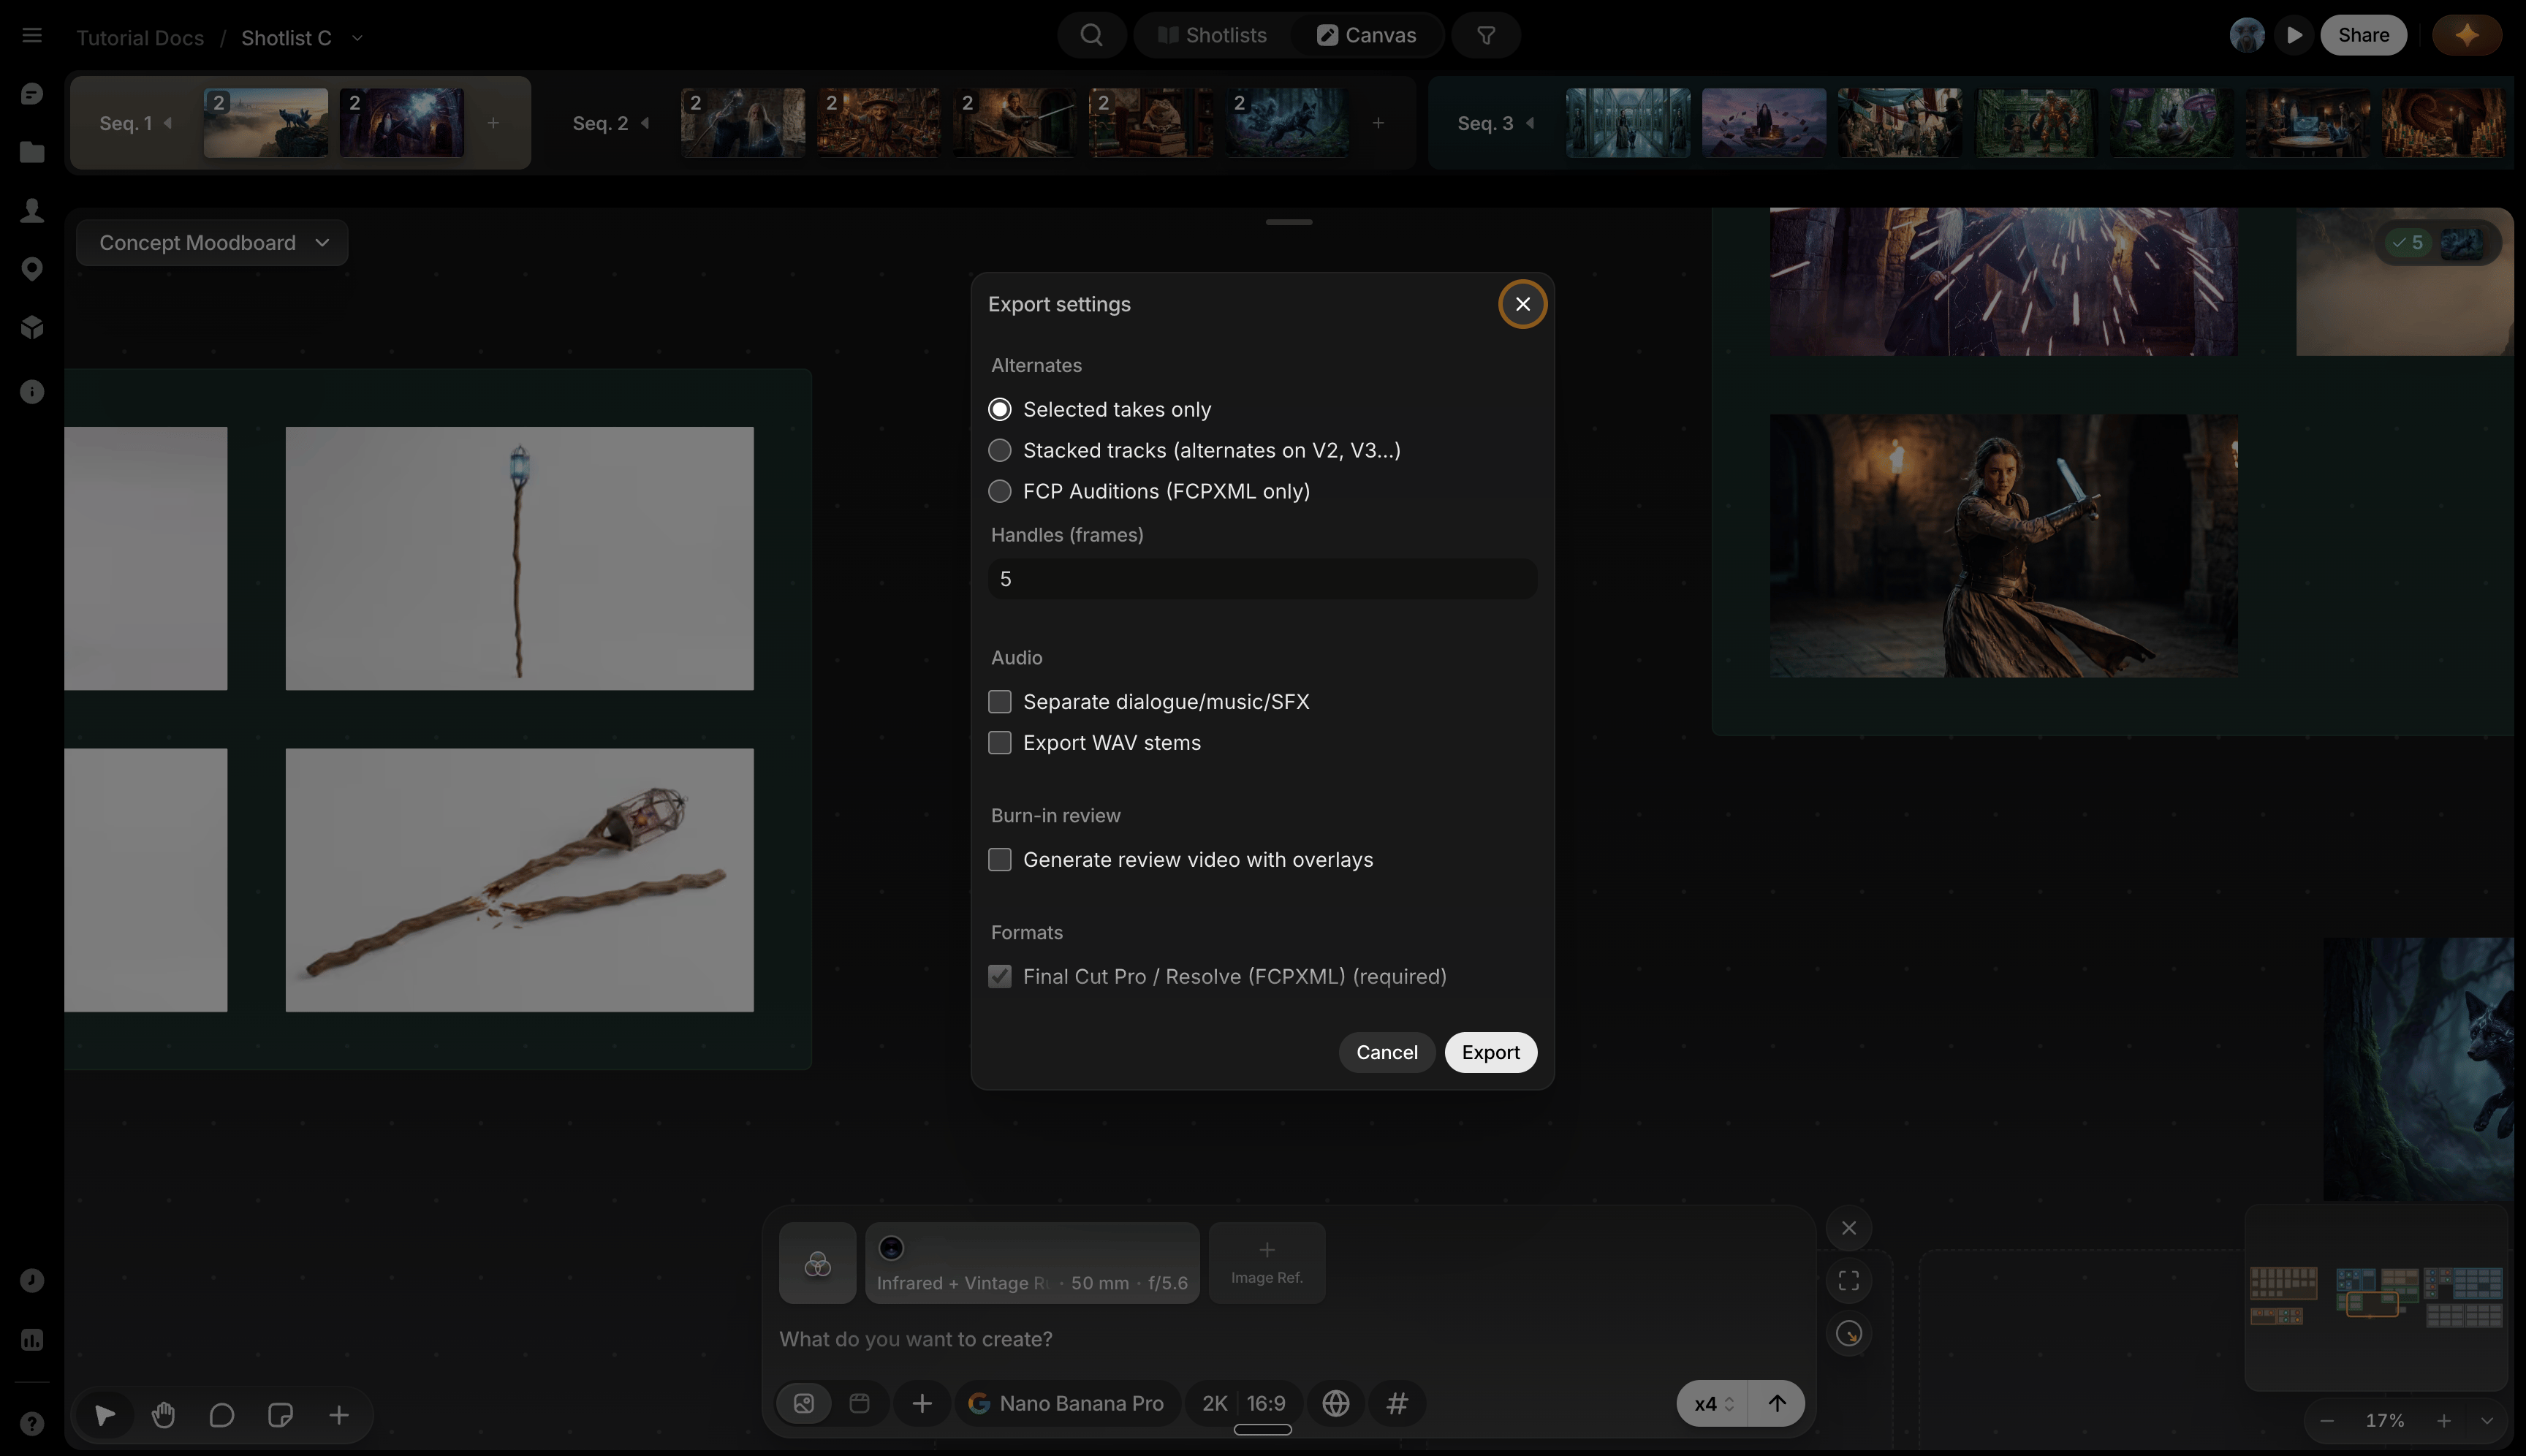 * **[Export](/preview/settings-menu#export)**: from the Project menu, exports every sequence in your active Shotlist as a ZIP with media and an FCPXML timeline.
* **Export just one sequence**: right-click any sequence in the timeline and choose **Export sequence** for the same export, scoped to just that one.
## Vocabulary
* **Shot list**: a full set of sequences and shots; a project can have multiple.
* **Sequence**: how you organize shots within a shot list.
* **Shot**: where you save your selects.
* **Select/Take**: a file saved to a shot.
* **File**: a single generation.
## Continue
* [Studio](/preview/canvas-overview) for the full canvas layout, collaborators, and where new files appear.
* [Prompt Box](/preview/prompt-box-overview) for generation and references in depth.
* [Preview Agent](/preview/agent) for the chat-based path through all of this.
* **[Export](/preview/settings-menu#export)**: from the Project menu, exports every sequence in your active Shotlist as a ZIP with media and an FCPXML timeline.
* **Export just one sequence**: right-click any sequence in the timeline and choose **Export sequence** for the same export, scoped to just that one.
## Vocabulary
* **Shot list**: a full set of sequences and shots; a project can have multiple.
* **Sequence**: how you organize shots within a shot list.
* **Shot**: where you save your selects.
* **Select/Take**: a file saved to a shot.
* **File**: a single generation.
## Continue
* [Studio](/preview/canvas-overview) for the full canvas layout, collaborators, and where new files appear.
* [Prompt Box](/preview/prompt-box-overview) for generation and references in depth.
* [Preview Agent](/preview/agent) for the chat-based path through all of this.